---
title: Build Out Placements
description: Here's How to Build Out Placements in Bionic for Agencies.
---
[Skip to content](https://help.bionic-ads.com/knowledge/build-out-placements#main-content)
[![Bionic-Logo-184x60-white.png\]](https://help.bionic-ads.com/hs-fs/hubfs/Bionic-Logo-184x60-white.png?height=40&name=Bionic-Logo-184x60-white.png)](https://help.bionic-ads.com/knowledge?hsLang=en)
Open main navigation
Close main navigation
- [Go to Bionic Website](https://www.bionic-ads.com/)
[Go to Bionic Website](https://www.bionic-ads.com/)
Hello. How can we help you?
- There are no suggestions because the search field is empty.
1. [Bionic Knowledge Base](https://help.bionic-ads.com/knowledge?hsLang=en)
2. [Bionic for Agencies](https://help.bionic-ads.com/knowledge/bionic-for-agencies?hsLang=en)
3. [Create Perfect Media Plans](https://help.bionic-ads.com/knowledge/bionic-for-agencies?hsLang=en#create-perfect-media-plans)
# Build Out Placements
## Here's How to Build Out Placements in Bionic for Agencies.
**Learn in Bionic Academy: [Manage Media Plans](https://help.bionic-ads.com/knowledge/manage-media-plans?hsLang=en)**
Placements are the details of each ad that you are buying in your media plan.
In your media plan, you can to add placements in a few different ways: by adding new blank placements, using the find tab, adding packages, roadblocks, or using the clone function to generate like placements that can be changed to reflect differences.
In this article, we'll cover how to build placements in Bionic:
1. [Add Blank Line](https://help.bionic-ads.com/knowledge/build-out-placements#blank-line)
2. [Select a Program](https://help.bionic-ads.com/knowledge/build-out-placements#SelectProgram)
3. [Choose a Product](https://help.bionic-ads.com/knowledge/build-out-placements#ChooseProduct)
4. [Add Targeting](https://help.bionic-ads.com/knowledge/build-out-placements#AddTargeting)
5. [Select a Media Channel](https://help.bionic-ads.com/knowledge/build-out-placements#MediaChannel)
6. [Include Ad Unit](https://help.bionic-ads.com/knowledge/build-out-placements#AdUnit)
7. [Enter Ad Specs](https://help.bionic-ads.com/knowledge/build-out-placements#AdSpecs)
8. [Associate an Ad](https://help.bionic-ads.com/knowledge/build-out-placements#Ad)
9. [Select Flight Dates](https://help.bionic-ads.com/knowledge/build-out-placements#FlightDates)
10. [Choose Day Parts](https://help.bionic-ads.com/knowledge/build-out-placements#DayParts)
11. [Enter Rates](https://help.bionic-ads.com/knowledge/build-out-placements#Rates)
12. [Update Quantity](https://help.bionic-ads.com/knowledge/build-out-placements#Quantity)
### Add Blank Line
The first thing that you need when building out a new placement is to add a new line:
1. In a media plan, click on the **Add Placements arrow**.
2. Select **Add Blank Line.**
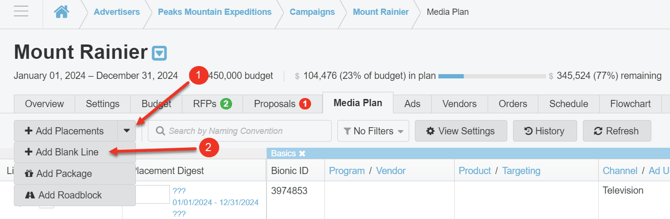
NOTE: As mentioned, there are other ways to add placements. To learn more on how to add placements through other ways click on the following links:
- [Build out Packages and Roadblocks](https://help.bionic-ads.com/knowledge/build-out-packages-roadblocks?hsLang=en)
- [Clone Placements](https://help.bionic-ads.com/knowledge/clone-placements?hsLang=en)
- [Research Advertising Opportunities](https://help.bionic-ads.com/knowledge/research-advertising-opportunities?hsLang=en)
### Select a Program
Once a blank line has been added, you can start to fill in the placement details. First, you will select a Program:
1. Click in the Program field andtype your desired **Program Name**.
2. Select from the **Typeahead Dropdown List**.
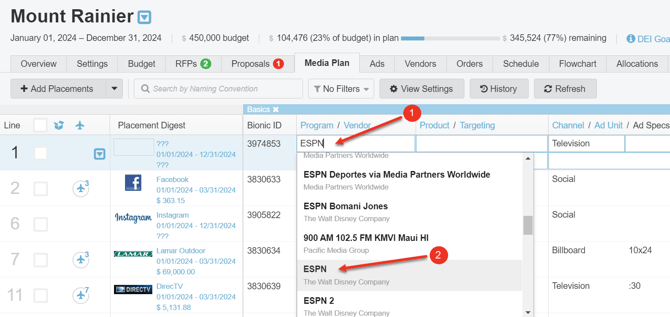
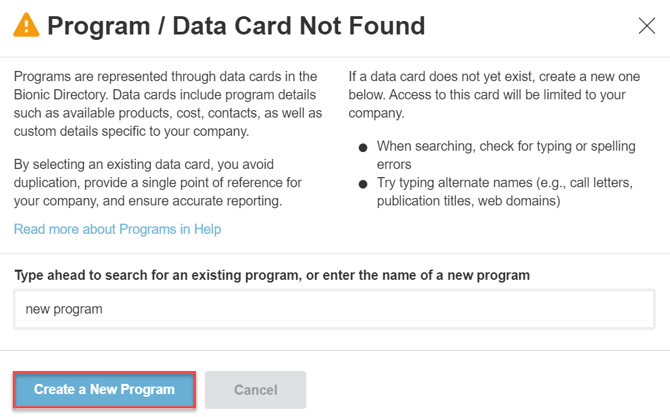
NOTE: If a Program does not appear in the Typeahead Dropdown List, you can follow the instructions to Create a New Program. Once you have created the new program, please contact Bionic Customer Support (support@bionic-ads.com) to confirm the newly added program gets added to our database properly.
TIP: Another way to Select a Program is to utilize the Find Tab by clicking the Add Placements Button. Learn more here: [Research Advertising Opportunities](https://help.bionic-ads.com/knowledge/research-advertising-opportunities?hsLang=en).
### Choose a Product
After selecting a program, you will then choose a product:
1. Click in the **Product field**.
2. Select from the **typeahead** **dropdown list or manually enter a product**.
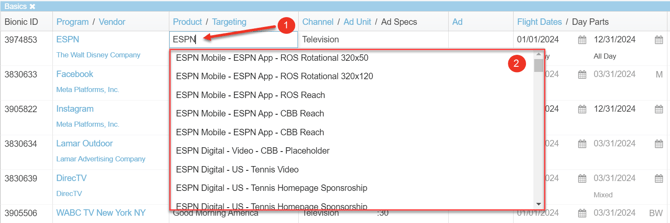
**NOTE:** Products added manually will automatically be added to your "custom products" on the data card so that you may access them later. Your Product Name/Description is limited to 100 characters.
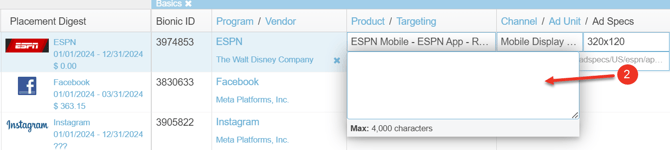
### Add Targeting
You have the option to enter targeting information for this placement:
1. Click in the **text field underneath the Product to open the Targeting Text Box**.
2. Enter in **targeting details**.

### Select a Media Channel
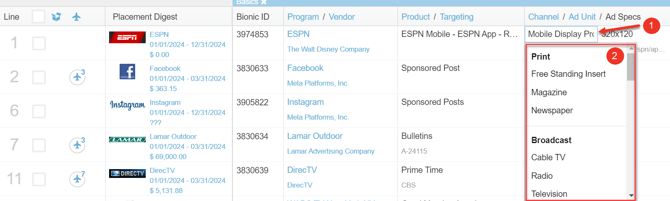
The channel field will automatically populate if you selected a Product from the menu. The field should represent the respective channel for this line item. You have the option to change the pre-selected channel:
1. Click in the **Channel Field**.
2. Select a **channel by using the dropdown**. Bionic supports [every media channel](https://help.bionic-ads.com/knowledge/which-media-channels-does-bionic-support?hsLang=en) in your media plan.
### Include Ad Unit
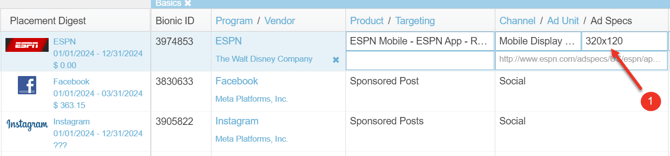
The ad unit will automatically populate if you selected a Product from the menu. The field should present the appropriate ad unit for this line item. You have the option to update the ad unit:
1. Click in the **Ad Unit Field and enter in Ad Unit**.
### **Enter Ad Specs**
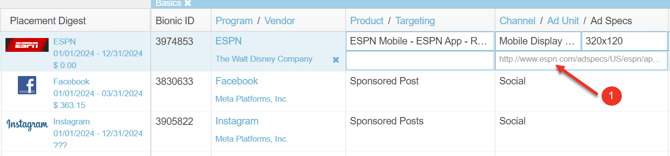
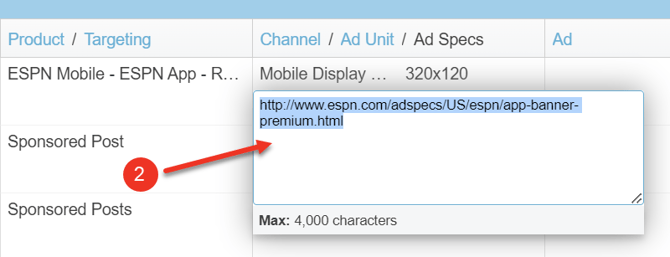
The Ad Specs field will allow you to enter Ad Specs as needed:
1. Click in the **Ad Specs Field**.
2. Enter in **Ad Specs information**.
### **Associate an Ad**
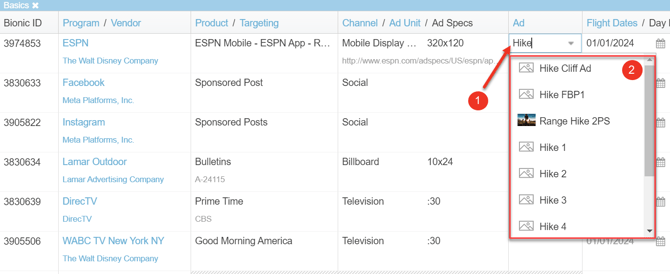
If you would like to identify the Ad associated with this placement, you can select it in the Ad column. This will allow you to include the Ad in your media plan presentation and reporting.
1. Click in the **Ad Field**.
2. Select from the **typeahead** **dropdown list**
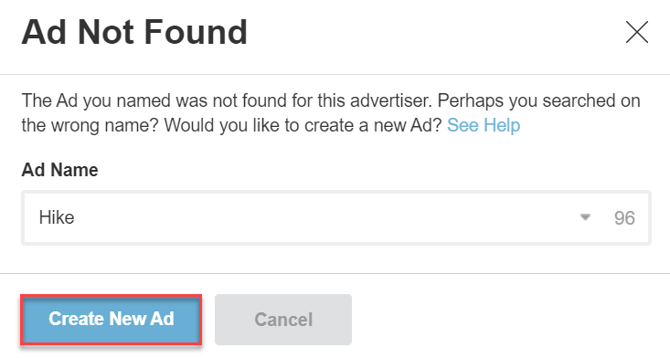
NOTE: If an Ad does not appear in the Typeahead Dropdown List, you can follow the instructions to Create New Ad. Learn more on how to [Create a New Ad](https://help.bionic-ads.com/knowledge/manage-ads?hsLang=en).
### **Select Flight Dates**
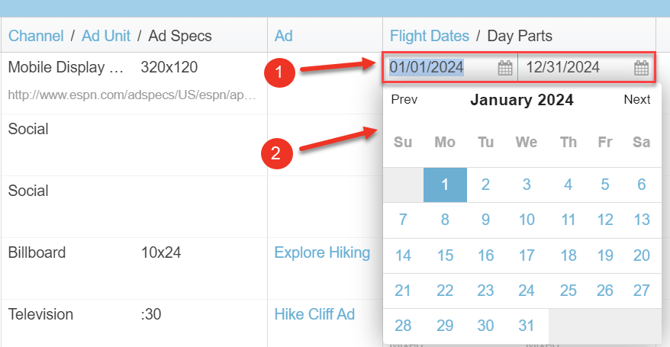
The flight dates will automatically populate based on the flight dates set for the campaign. However, you may click in the fields to modify specific line items:
1. Click on the **Start or End Date Field** to modify.
2. Select **date from the calendar or free typed using the MM/DD/YYYY format**.
NOTE: When you click into the End Date field, you can select from the available End Date Policies. The End Date will automatically populate based on the Start Date and policy selected, unless Specific Date is the policy.
TIP: To use more detailed flighting please review this help article: [Flight Placements and Packages](https://help.bionic-ads.com/knowledge/flight-placements-packages?hsLang=en).
### **Choose Day Parts**
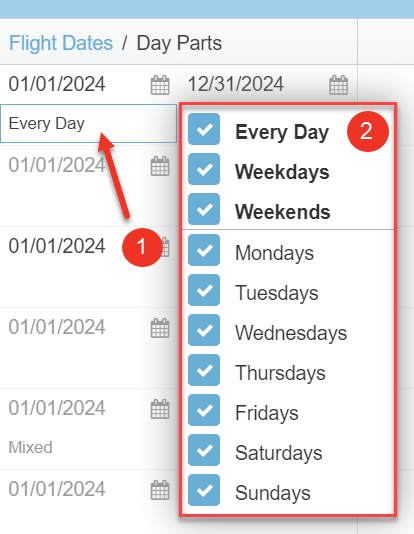
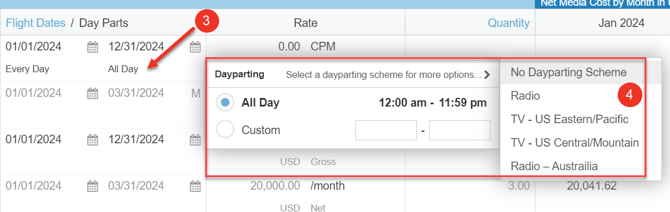
Day parts allow you to identify specific days and times ads will run. It will default to Every Day, All Day. You have the ability to identify specific days of the week:
1. Click in the **first Day Parts field to display the Day menu**.
2. Select the **Day Parts**. By default, all days will be selected. You may use the shortcut options at the top to make it easy. For example, if you deselect Weekdays, the Every Day, Weekdays, and all week day selections will automatically get deselected - leaving you with just Weekends, Saturdays & Sundays.
3. To select **specific times, click in the second Day Parts field**.
4. Select **specific times**. The menu will automatically reflect "schemes" applicable to the placement channel. You can select from the displayed times, or use the Custom option to identify specific time ranges.
### **Enter Rates**
The Rates will automatically pull from the data card, if available. Otherwise, you will need to enter them:
NOTE: Currency will default based on the currency set in campaign settings. If multiple currency is allowed in the campaign settings, you can change the currency for individual placements.
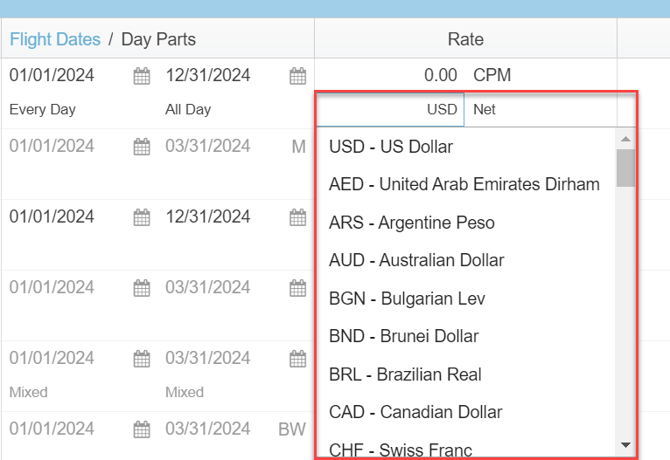
1. Click on the **Rate Field and Enter the Rate**.
2. Identify the **Rate Type** *(CPM, CPC, Per Spot, etc.)*.
3. Select between **Net, Gross, or Total**.
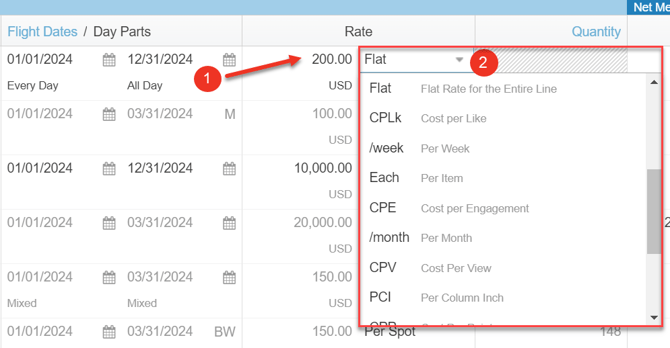
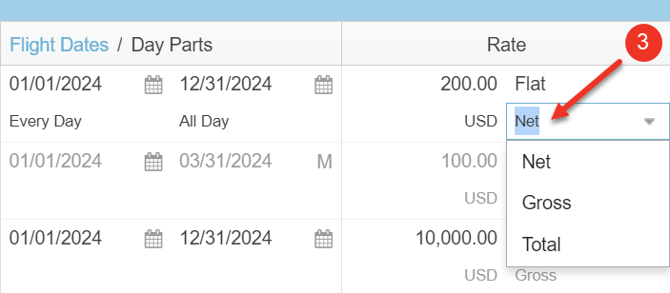
NOTE: If you would like to begin with a budget and back out any additional fees to calculate your Net (working) Media Cost, simply select Flat as your Rate Type, Total, and enter your budget as the Rate.
TIP: Rates will be added to "Our Rate" in the data card to help you keep track of current rates being paid for individual products.
### **Update Quantity**
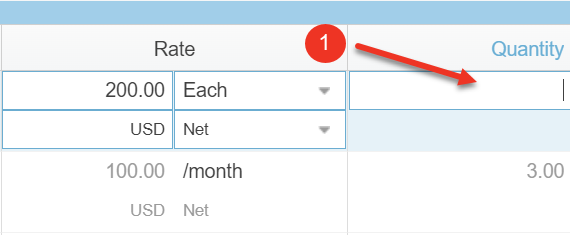
Enter the quantity that is applicable to the rate type.
1. Click in the **Quantity field and enter Quantity**.
### Next Steps
[Calculate Costs](https://help.bionic-ads.com/knowledge/manage-placement-costs?hsLang=en)
[Calculate Reach & Frequency](https://help.bionic-ads.com/knowledge/calculate-reach-frequency?hsLang=en)
[Establish KPI Goals](https://help.bionic-ads.com/knowledge/establish-placement-kpi-goals?hsLang=en)
- [Bionic for Agencies](https://help.bionic-ads.com/knowledge/bionic-for-agencies?hsLang=en#main-content)
- [Introduction to Bionic](https://help.bionic-ads.com/knowledge/bionic-for-agencies?hsLang=en#introduction-to-bionic)
- [Manage Your Advertisers](https://help.bionic-ads.com/knowledge/bionic-for-agencies?hsLang=en#manage-your-advertisers)
- [Manage Your Campaigns](https://help.bionic-ads.com/knowledge/bionic-for-agencies?hsLang=en#manage-your-campaigns)
- [Create Perfect Media Plans](https://help.bionic-ads.com/knowledge/bionic-for-agencies?hsLang=en#create-perfect-media-plans)
- [Manage Your Ads](https://help.bionic-ads.com/knowledge/bionic-for-agencies?hsLang=en#manage-your-ads)
- [Manage Your Vendor Database](https://help.bionic-ads.com/knowledge/bionic-for-agencies?hsLang=en#manage-your-vendor-database)
- [Automate RFP Workflow](https://help.bionic-ads.com/knowledge/bionic-for-agencies?hsLang=en#automate-rfp-workflow)
- [Create Beautiful Flowcharts](https://help.bionic-ads.com/knowledge/bionic-for-agencies?hsLang=en#create-beautiful-flowcharts)
- [Share Campaigns With Your Client Teams](https://help.bionic-ads.com/knowledge/bionic-for-agencies?hsLang=en#share-campaigns-with-your-client-teams)
- [Report DEI Scorecard](https://help.bionic-ads.com/knowledge/bionic-for-agencies?hsLang=en#report-dei-scorecard)
- [Send Electronic Insertion Orders](https://help.bionic-ads.com/knowledge/bionic-for-agencies?hsLang=en#send-electronic-insertion-orders)
- [Manage Media Tasks](https://help.bionic-ads.com/knowledge/bionic-for-agencies?hsLang=en#manage-media-tasks)
- [Deliver Flawless Naming Conventions](https://help.bionic-ads.com/knowledge/bionic-for-agencies?hsLang=en#deliver-flawless-naming-conventions)
- [Automate Ad Server Trafficking](https://help.bionic-ads.com/knowledge/bionic-for-agencies?hsLang=en#automate-ad-server-trafficking)
- [Integrate Performance Data](https://help.bionic-ads.com/knowledge/bionic-for-agencies?hsLang=en#integrate-performance-data)
- [Monitor Plan Schedules](https://help.bionic-ads.com/knowledge/bionic-for-agencies?hsLang=en#monitor-plan-schedules)
- [Monitor Ad Spot Delivery](https://help.bionic-ads.com/knowledge/bionic-for-agencies?hsLang=en#monitor-ad-spot-delivery)
- [Monitor Ad Delivery Pacing](https://help.bionic-ads.com/knowledge/bionic-for-agencies?hsLang=en#monitor-ad-delivery-pacing)
- [Automate Reporting](https://help.bionic-ads.com/knowledge/bionic-for-agencies?hsLang=en#automate-reporting)
- [Deliver Perfect Client Dashboards](https://help.bionic-ads.com/knowledge/bionic-for-agencies?hsLang=en#deliver-perfect-client-dashboards)
- [Reconcile Vendor Bills](https://help.bionic-ads.com/knowledge/bionic-for-agencies?hsLang=en#reconcile-vendor-bills)
- [Generate Tracking URLs](https://help.bionic-ads.com/knowledge/bionic-for-agencies?hsLang=en#generate-tracking-urls)
- [Integrate Your Accounting](https://help.bionic-ads.com/knowledge/bionic-for-agencies?hsLang=en#integrate-your-accounting)
- [Administer Your Account](https://help.bionic-ads.com/knowledge/bionic-for-agencies?hsLang=en#administer-your-account)
- [Integrate Your Bionic Data](https://help.bionic-ads.com/knowledge/bionic-for-agencies?hsLang=en#integrate-your-bionic-data)
- [Customize Bionic for Agencies](https://help.bionic-ads.com/knowledge/bionic-for-agencies?hsLang=en#customize-bionic-for-agencies)
- [Troubleshoot Bionic for Agencies](https://help.bionic-ads.com/knowledge/bionic-for-agencies?hsLang=en#troubleshoot-bionic-for-agencies)
- [FAQ - Frequently Asked Questions](https://help.bionic-ads.com/knowledge/bionic-for-agencies?hsLang=en#faq-frequently-asked-questions)
- [Bionic for Ad Sales](https://help.bionic-ads.com/knowledge/bionic-for-ad-sales?hsLang=en#main-content)
- [Get Started](https://help.bionic-ads.com/knowledge/bionic-for-ad-sales?hsLang=en#get-started)
- [Respond to an RFP](https://help.bionic-ads.com/knowledge/bionic-for-ad-sales?hsLang=en#respond-to-an-rfp)
- [Manage Your Programs](https://help.bionic-ads.com/knowledge/bionic-for-ad-sales?hsLang=en#manage-your-programs)
- [Manage Ad Sales Users](https://help.bionic-ads.com/knowledge/bionic-for-ad-sales?hsLang=en#manage-ad-sales-users)
- [Handle Orders](https://help.bionic-ads.com/knowledge/bionic-for-ad-sales?hsLang=en#handle-orders)
- [Understand Program Performance](https://help.bionic-ads.com/knowledge/bionic-for-ad-sales?hsLang=en#understand-program-performance)
- [Benchmark Your Performance](https://help.bionic-ads.com/knowledge/bionic-for-ad-sales?hsLang=en#benchmark-your-performance)
- [Handle Sales Leads](https://help.bionic-ads.com/knowledge/bionic-for-ad-sales?hsLang=en#handle-sales-leads)
- [Troubleshoot Bionic for Ad Sales](https://help.bionic-ads.com/knowledge/bionic-for-ad-sales?hsLang=en#troubleshoot-bionic-for-ad-sales)
- [Bionic for Advertisers](https://help.bionic-ads.com/knowledge/bionic-for-advertisers?hsLang=en#main-content)
- [Introduction to Bionic for Advertisers](https://help.bionic-ads.com/knowledge/bionic-for-advertisers?hsLang=en#introduction-to-bionic-for-advertisers)
- [Manage Agency Teams](https://help.bionic-ads.com/knowledge/bionic-for-advertisers?hsLang=en#manage-agency-teams)
- [Manage Campaign for Advertisers](https://help.bionic-ads.com/knowledge/bionic-for-advertisers?hsLang=en#manage-campaign-for-advertisers)
- [Build Advertiser Flowcharts](https://help.bionic-ads.com/knowledge/bionic-for-advertisers?hsLang=en#build-advertiser-flowcharts)
- [Monitor Schedules for Advertisers](https://help.bionic-ads.com/knowledge/bionic-for-advertisers?hsLang=en#monitor-schedules-for-advertisers)
- [Monitor Media Investment Patterns](https://help.bionic-ads.com/knowledge/bionic-for-advertisers?hsLang=en#monitor-media-investment-patterns)
- [Monitor Performance for Advertisers](https://help.bionic-ads.com/knowledge/bionic-for-advertisers?hsLang=en#monitor-performance-for-advertisers)
[](https://www.bionic-ads.com/)
Bionic Help Center
Copyright © 2025, Bionic Advertising Systems