---
title: Utilize Excel To Manage Your Media Plan
description: Here's How to Utilize Excel to Manage Your Media Plan for Bionic for Agencies.
---
[Skip to content](https://help.bionic-ads.com/knowledge/utilize-excel-to-manage-your-media-plan#main-content)
[![Bionic-Logo-184x60-white.png\]](https://help.bionic-ads.com/hs-fs/hubfs/Bionic-Logo-184x60-white.png?height=40&name=Bionic-Logo-184x60-white.png)](https://help.bionic-ads.com/knowledge?hsLang=en)
Open main navigation
Close main navigation
- [Go to Bionic Website](https://www.bionic-ads.com/)
[Go to Bionic Website](https://www.bionic-ads.com/)
Hello. How can we help you?
- There are no suggestions because the search field is empty.
1. [Bionic Knowledge Base](https://help.bionic-ads.com/knowledge?hsLang=en)
2. [Bionic for Agencies](https://help.bionic-ads.com/knowledge/bionic-for-agencies?hsLang=en)
3. [Create Perfect Media Plans](https://help.bionic-ads.com/knowledge/bionic-for-agencies?hsLang=en#create-perfect-media-plans)
# Utilize Excel To Manage Your Media Plan
## Here's How to Utilize Excel to Manage Your Media Plan for Bionic for Agencies.
Learn in Bionic Academy: [Utilize Excel To Manage Your Media Plan](https://academy.bionic-ads.com/app/courses/1f6de5c7-67f0-42ae-be93-9e8b562cfcc7)
Bionic offers you the ability to create, manage, and edit your media plans via Excel.
In this article, we'll cover how to:
1. [Get Bionic Media Plan Template](https://help.bionic-ads.com/knowledge/utilize-excel-to-manage-your-media-plan#Get)
2. [Complete Placement Details](https://help.bionic-ads.com/knowledge/utilize-excel-to-manage-your-media-plan#Complete)
3. [Create Placement With Flighting](https://help.bionic-ads.com/knowledge/utilize-excel-to-manage-your-media-plan#PlacementFlighting)
4. [Create a Package or Roadblock](https://help.bionic-ads.com/knowledge/utilize-excel-to-manage-your-media-plan#PackageFlighting)
5. [Flight at the Package/Roadblock level](https://help.bionic-ads.com/knowledge/utilize-excel-to-manage-your-media-plan#PackageLevelFlighting)
6. [Include/Exclude Itemized Costs](https://help.bionic-ads.com/knowledge/utilize-excel-to-manage-your-media-plan#ItemizedCosts)
7. [Enter KPIs](https://help.bionic-ads.com/knowledge/utilize-excel-to-manage-your-media-plan#KPI)
8. [Enter Custom Column Values](https://help.bionic-ads.com/knowledge/utilize-excel-to-manage-your-media-plan#CustomColumns)
9. [Understand the Checksum Column](https://help.bionic-ads.com/knowledge/utilize-excel-to-manage-your-media-plan#Checksum)
10. [Delete Existing Placements](https://help.bionic-ads.com/knowledge/utilize-excel-to-manage-your-media-plan#Delete)
11. [Upload Your Worksheet](https://help.bionic-ads.com/knowledge/utilize-excel-to-manage-your-media-plan#Upload)
### **Get Bionic Media Plan Template**
To begin, you need to download the media plan worksheet specific to the campaign that you are working with. Here's how to get the Media Plan Template for Excel:
NOTE: Prior to Downloading the Media Plan Worksheet, ensure you have:
1. [Setup and add custom column](https://help.bionic-ads.com/knowledge/set-campaign-custom-columns?hsLang=en) picklists you may need for your plan.
2. Setup and add [Production Costs](https://help.bionic-ads.com/knowledge/set-campaign-default-production-costs?hsLang=en), [Agency Compensation](https://help.bionic-ads.com/knowledge/set-campaign-default-agency-compensation?hsLang=en), and [Delivery Costs](https://help.bionic-ads.com/knowledge/set-campaign-default-delivery-costs?hsLang=en) applicable to this media plan.
3. [Setup KPIs](https://help.bionic-ads.com/knowledge/establish-campaign-kpis?hsLang=en) you want to track.
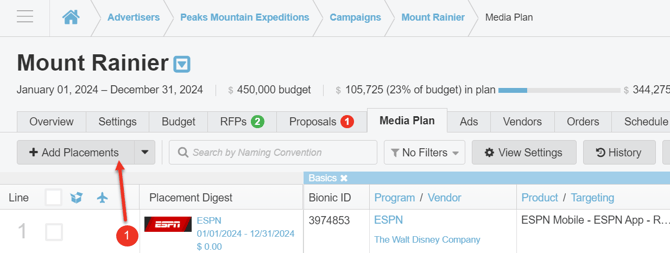
1. In a Media Plan, click the **Add Placements** button of the plan.
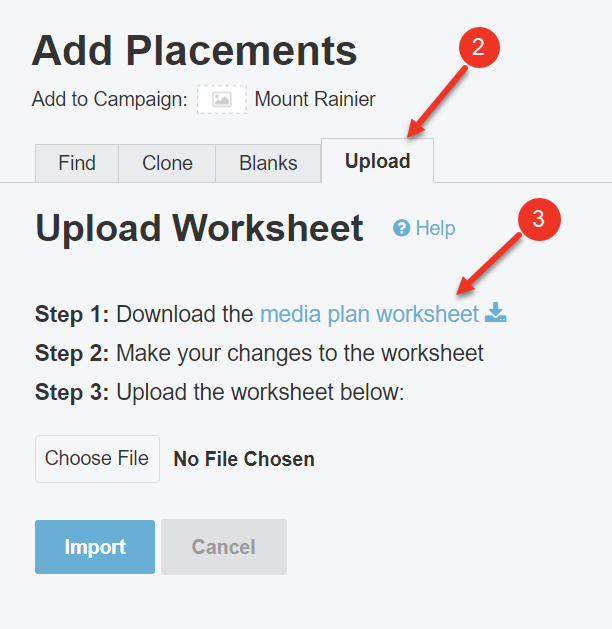
2. Select the **Upload** tab.
3. Download the **Media Plan Worksheet** from the blue link in Step 1.
#### The media plan worksheet has two tabs:
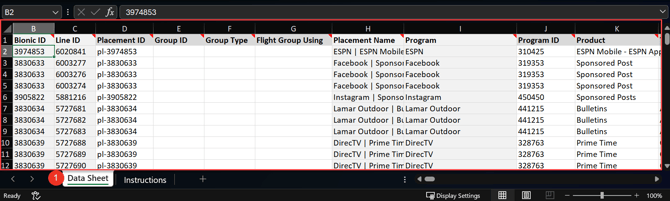
1. The **Data Sheet** tab contains the information that will be uploaded to Bionic. If you have exported a plan already in Bionic, the sheet will be populated with that data. If you are starting with a blank campaign (to load your existing Excel spreadsheet), you will need to translate the data to this template.
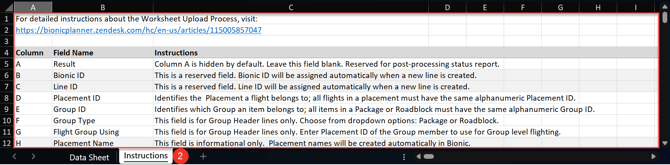
2. The **Instructions** tab provides a list of the columns on the Data Sheet tab with definitions for each field you can refer to.
NOTE: Each column in the Data Sheet is required for the upload to work properly. You can hide columns or leave individual cells blank, but **do not delete any columns from the media plan worksheet.**
TIP: There are characters limits on some columns. Please be mindful of this as this could contribute to an upload worksheet error:
- Product column = 100 characters
- Targeting column = 4,000 characters
- Ad Unit column = 4,000 characters
### **Complete Placement Details**
Here is how to use the Media Plan Worksheet to update/create placements. If you have exported a plan from Bionic, simply change or add information as needed.
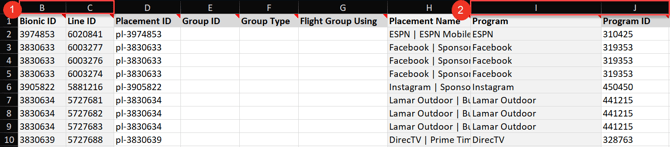
1. **Columns B & C** - These fields are automatically populated by Bionic. **Column D** will represent each placement as pl-\. *NOTE: For new placement being created, leave B & C blank. Enter Column D to define the next placement. Do not change the IDs for plans exported.*
2. Enter **Program name in column I** *(optional)* and **Program ID in column J**. *NOTE: If you are importing from an existing media plan in Excel, you will need to get the Program IDs in Bionic to map the program to the associated data card in Bionic. You can use the Search in the upper right corner to search by program name. The ID will be presented with the Program Name in the search results.*
3. Enter any **additional information you have in columns K-AA+** *(Gross Media Cost and Net Media Cost are informational and will be overridden by Bionic calculations)*
4. Save **Your Worksheet**.
5. [Upload worksheet into Bionic](https://help.bionic-ads.com/knowledge/utilize-excel-to-manage-your-media-plan#Upload).

NOTE: The following sections in this help article will assist you on how to handle flighting, packages & roadblocks, and flighted packages & roadblocks.
### **Create Placement With Flighting**
If you need to create a placement with flighting follow the steps in this section. Skip this step if you have exported a plan from Bionic.
1. Create a new placement following the steps above in [Complete Placement Details](https://help.bionic-ads.com/knowledge/utilize-excel-to-manage-your-media-plan#Complete). This will create the first flight of your placement.
2. To Add Flights, **copy and paste the entire row for the placement as many times as you need flights** *(For Example, If you need 4 flights for the placement, copy and paste until there are 4 rows for this placement.)*
3. Enter an **alphanumerical value in the Placement ID field for each row** to identify that all flights are part of the same placement. Using the next ID in the series is usually best practice.
4. Edit **dates to reflect dates of each flight** *(NOTE: there should be no overlapping flight dates.)*
5. Edit **other information for each flight as needed** **such as rate amount, quantity, picklist columns**.
6. Save **Your Worksheet**.
7. [Upload worksheet into Bionic](https://help.bionic-ads.com/knowledge/utilize-excel-to-manage-your-media-plan#Upload).
*Example of a Placement with Flighting in the Worksheet:*

### **Create a Package or Roadblock**
If you need to create a package or roadblock follow the steps in this section.
NOTE: Column mentions in this section pertain to the example screenshot provided.
1. Add a **Row in the worksheet for the Package/Roadblock Header**, leaving columns B-D blank.
2. Enter an **alphanumeric value in the Group ID field** to identify the Package or Roadblock.
3. In the **Group Type field** use the dropdown list to select Package or Roadblock.
4. Enter **Program, Program ID, Rate Amount, Rate Type, Quantity** and any other information for the package/roadblock header.
5. Add **rows in the worksheet for each Package/Roadblock member**, leaving columns B-D blank
6. In column E, **enter the same Group ID** as you did in Step 2 above.
7. Leave **column F blank for package/roadblock members**.
8. Enter any other information you have in columns H-AI+
9. Save **Your Worksheet**.
10. [Upload worksheet into Bionic](https://help.bionic-ads.com/knowledge/utilize-excel-to-manage-your-media-plan#Upload).
*Example of a Package in the Worksheet:*

### **Flight at the Package/Roadblock level**
1. Create a Package/Roadblock by following the above section: [Create a Package or Roadblock](https://help.bionic-ads.com/knowledge/utilize-excel-to-manage-your-media-plan#PackageFlighting).
2. Create a flighted placement by **copying an existing package member row and inserting a new row below that** (do this however many times you need your package to be flighted).
3. Edit the **dates for the flighted rows** to represent how you need the flights broken up.
4. Use the Placement ID field to identify that there will be a flight by **entering an alphanumeric value into the field** (For Example: Flight1 or 1234 or FBFlight, etc.). **Enter same value into Placement ID field for each flighted row**.
5. Copy the **Placement ID value and paste it into the Flight Group Using field at the package/roadblock header row** - this will identify the flighted placement that will be used flight the package/roadblock at the header level
6. Save **Your Worksheet**.
7. [Upload worksheet into Bionic](https://help.bionic-ads.com/knowledge/utilize-excel-to-manage-your-media-plan#Upload).
*Example of flighting at the Package Level in the Worksheet:*

### **Include/Exclude Itemized Costs**
If you have Itemized Costs (Production Costs, Agency Compensation, and/or Delivery Costs) in your plan, you may opt to Include or Exclude specific costs for each placement.
NOTE: If you need to override default costs, you must do this from within the Bionic media plan directly.
Costs will begin at Column 'A*x*'.
1. For each cost, select **Include or Exclude**. *NOTE: You may use Copy/Paste to populate multiple lines at once. Excluded fields will be highlighted in RED.*
2. Save **Your Worksheet**.
3. [Upload worksheet into Bionic](https://help.bionic-ads.com/knowledge/utilize-excel-to-manage-your-media-plan#Upload).
### **Enter KPIs**
All KPIs included in the media plan will be included in the worksheet. KPIs are listed after the Costs and Landing Page URL (column will vary). The "Cost Per" for each KPI will be displayed for informational purposes.
1. Enter the **Goal for each KPI** you want to track for each placement. *NOTE: Entering '0' will translate literally to '0' and a blank field will exclude the KPI for that placement.*
2. Save **Your Worksheet**.
3. [Upload worksheet into Bionic](https://help.bionic-ads.com/knowledge/utilize-excel-to-manage-your-media-plan#Upload).
NOTE: Upon loading the worksheet, the "Cost Per" will be automatically calculated based on the Goal entered.
### **Enter Custom Column Values**
If you have included Custom Columns in your media plan, they will be included in the worksheet.
1. Enter the **value for each Custom Column, or select from the available Picklist items**.
2. Save **Your Worksheet**.
3. [Upload worksheet into Bionic](https://help.bionic-ads.com/knowledge/utilize-excel-to-manage-your-media-plan#Upload).
### **Understand the Checksum Column**
This field is for Bionic internal use only. It is used to help Bionic identify which placements have changes made to them, in turn, making the upload process faster, especially if limited data was modified. Any changes to this field, or removal of the data, will result in Bionic processing an update to the placement, even if nothing changed, resulting in longer processing time.
For new line items please leave this field blank.
### **Delete Existing Placements**
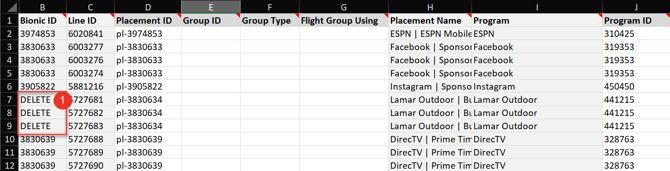
If placements exist in your media plan that you would like to remove, you can delete them in batch using this worksheet.
1. In the Bionic ID field for each of these placements, enter **DELETE**.
2. Save **Your Worksheet**.
3. [Upload worksheet into Bionic](https://help.bionic-ads.com/knowledge/utilize-excel-to-manage-your-media-plan#Upload).
### **Upload Your Worksheet**
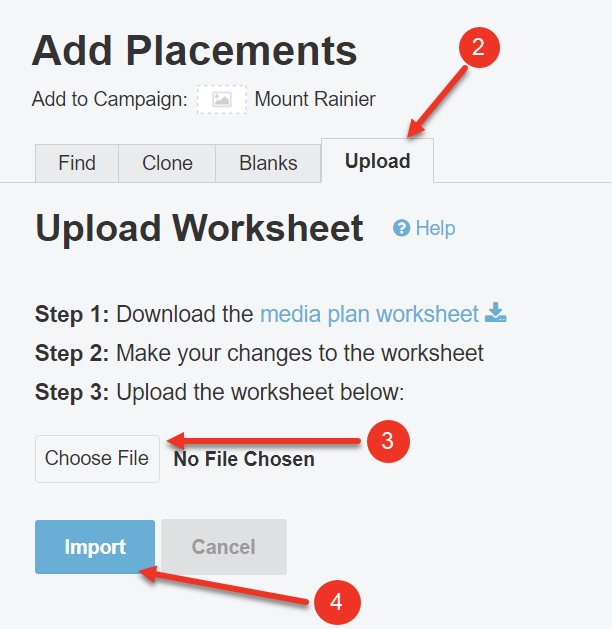
1. In the applicable Campaign's Media Plan, click the **Add Placements** button.
2. Select the **Upload** tab.
3. Click 'Choose File' and Select **Worksheet** **File**.
4. Click **Import**.

NOTE: After uploading Your Media Plan Worksheet you will receive an email from Bionic with the results of your upload.
You may open the spreadsheet that is attached to the email – here you will see that a new column “Results” has been added. This column gives details on whether your placement(s) were created, updated or failed to be created or updated.
Details are provided as to what was updated or created or what failed to be created or updated
- [Bionic for Agencies](https://help.bionic-ads.com/knowledge/bionic-for-agencies?hsLang=en#main-content)
- [Introduction to Bionic](https://help.bionic-ads.com/knowledge/bionic-for-agencies?hsLang=en#introduction-to-bionic)
- [Manage Your Advertisers](https://help.bionic-ads.com/knowledge/bionic-for-agencies?hsLang=en#manage-your-advertisers)
- [Manage Your Campaigns](https://help.bionic-ads.com/knowledge/bionic-for-agencies?hsLang=en#manage-your-campaigns)
- [Create Perfect Media Plans](https://help.bionic-ads.com/knowledge/bionic-for-agencies?hsLang=en#create-perfect-media-plans)
- [Manage Your Ads](https://help.bionic-ads.com/knowledge/bionic-for-agencies?hsLang=en#manage-your-ads)
- [Manage Your Vendor Database](https://help.bionic-ads.com/knowledge/bionic-for-agencies?hsLang=en#manage-your-vendor-database)
- [Automate RFP Workflow](https://help.bionic-ads.com/knowledge/bionic-for-agencies?hsLang=en#automate-rfp-workflow)
- [Create Beautiful Flowcharts](https://help.bionic-ads.com/knowledge/bionic-for-agencies?hsLang=en#create-beautiful-flowcharts)
- [Share Campaigns With Your Client Teams](https://help.bionic-ads.com/knowledge/bionic-for-agencies?hsLang=en#share-campaigns-with-your-client-teams)
- [Report DEI Scorecard](https://help.bionic-ads.com/knowledge/bionic-for-agencies?hsLang=en#report-dei-scorecard)
- [Send Electronic Insertion Orders](https://help.bionic-ads.com/knowledge/bionic-for-agencies?hsLang=en#send-electronic-insertion-orders)
- [Manage Media Tasks](https://help.bionic-ads.com/knowledge/bionic-for-agencies?hsLang=en#manage-media-tasks)
- [Deliver Flawless Naming Conventions](https://help.bionic-ads.com/knowledge/bionic-for-agencies?hsLang=en#deliver-flawless-naming-conventions)
- [Automate Ad Server Trafficking](https://help.bionic-ads.com/knowledge/bionic-for-agencies?hsLang=en#automate-ad-server-trafficking)
- [Integrate Performance Data](https://help.bionic-ads.com/knowledge/bionic-for-agencies?hsLang=en#integrate-performance-data)
- [Monitor Plan Schedules](https://help.bionic-ads.com/knowledge/bionic-for-agencies?hsLang=en#monitor-plan-schedules)
- [Monitor Ad Spot Delivery](https://help.bionic-ads.com/knowledge/bionic-for-agencies?hsLang=en#monitor-ad-spot-delivery)
- [Monitor Ad Delivery Pacing](https://help.bionic-ads.com/knowledge/bionic-for-agencies?hsLang=en#monitor-ad-delivery-pacing)
- [Automate Reporting](https://help.bionic-ads.com/knowledge/bionic-for-agencies?hsLang=en#automate-reporting)
- [Deliver Perfect Client Dashboards](https://help.bionic-ads.com/knowledge/bionic-for-agencies?hsLang=en#deliver-perfect-client-dashboards)
- [Reconcile Vendor Bills](https://help.bionic-ads.com/knowledge/bionic-for-agencies?hsLang=en#reconcile-vendor-bills)
- [Generate Tracking URLs](https://help.bionic-ads.com/knowledge/bionic-for-agencies?hsLang=en#generate-tracking-urls)
- [Integrate Your Accounting](https://help.bionic-ads.com/knowledge/bionic-for-agencies?hsLang=en#integrate-your-accounting)
- [Administer Your Account](https://help.bionic-ads.com/knowledge/bionic-for-agencies?hsLang=en#administer-your-account)
- [Integrate Your Bionic Data](https://help.bionic-ads.com/knowledge/bionic-for-agencies?hsLang=en#integrate-your-bionic-data)
- [Customize Bionic for Agencies](https://help.bionic-ads.com/knowledge/bionic-for-agencies?hsLang=en#customize-bionic-for-agencies)
- [Troubleshoot Bionic for Agencies](https://help.bionic-ads.com/knowledge/bionic-for-agencies?hsLang=en#troubleshoot-bionic-for-agencies)
- [FAQ - Frequently Asked Questions](https://help.bionic-ads.com/knowledge/bionic-for-agencies?hsLang=en#faq-frequently-asked-questions)
- [Bionic for Ad Sales](https://help.bionic-ads.com/knowledge/bionic-for-ad-sales?hsLang=en#main-content)
- [Get Started](https://help.bionic-ads.com/knowledge/bionic-for-ad-sales?hsLang=en#get-started)
- [Respond to an RFP](https://help.bionic-ads.com/knowledge/bionic-for-ad-sales?hsLang=en#respond-to-an-rfp)
- [Manage Your Programs](https://help.bionic-ads.com/knowledge/bionic-for-ad-sales?hsLang=en#manage-your-programs)
- [Manage Ad Sales Users](https://help.bionic-ads.com/knowledge/bionic-for-ad-sales?hsLang=en#manage-ad-sales-users)
- [Handle Orders](https://help.bionic-ads.com/knowledge/bionic-for-ad-sales?hsLang=en#handle-orders)
- [Understand Program Performance](https://help.bionic-ads.com/knowledge/bionic-for-ad-sales?hsLang=en#understand-program-performance)
- [Benchmark Your Performance](https://help.bionic-ads.com/knowledge/bionic-for-ad-sales?hsLang=en#benchmark-your-performance)
- [Handle Sales Leads](https://help.bionic-ads.com/knowledge/bionic-for-ad-sales?hsLang=en#handle-sales-leads)
- [Troubleshoot Bionic for Ad Sales](https://help.bionic-ads.com/knowledge/bionic-for-ad-sales?hsLang=en#troubleshoot-bionic-for-ad-sales)
- [Bionic for Advertisers](https://help.bionic-ads.com/knowledge/bionic-for-advertisers?hsLang=en#main-content)
- [Introduction to Bionic for Advertisers](https://help.bionic-ads.com/knowledge/bionic-for-advertisers?hsLang=en#introduction-to-bionic-for-advertisers)
- [Manage Agency Teams](https://help.bionic-ads.com/knowledge/bionic-for-advertisers?hsLang=en#manage-agency-teams)
- [Manage Campaign for Advertisers](https://help.bionic-ads.com/knowledge/bionic-for-advertisers?hsLang=en#manage-campaign-for-advertisers)
- [Build Advertiser Flowcharts](https://help.bionic-ads.com/knowledge/bionic-for-advertisers?hsLang=en#build-advertiser-flowcharts)
- [Monitor Schedules for Advertisers](https://help.bionic-ads.com/knowledge/bionic-for-advertisers?hsLang=en#monitor-schedules-for-advertisers)
- [Monitor Media Investment Patterns](https://help.bionic-ads.com/knowledge/bionic-for-advertisers?hsLang=en#monitor-media-investment-patterns)
- [Monitor Performance for Advertisers](https://help.bionic-ads.com/knowledge/bionic-for-advertisers?hsLang=en#monitor-performance-for-advertisers)
[](https://www.bionic-ads.com/)
Bionic Help Center
Copyright © 2025, Bionic Advertising Systems