Integrate With QuickBooks
Here's How to Integrate QuickBooks with Bionic for Agencies.
Learn in Bionic Academy: Integrate with Quickbooks
Integrating QuickBooks with Bionic enables you to reconcile and log the bills received from your vendors directly within Bionic, and then transfer this information automatically to QuickBooks where your finance team can make the necessary payments, which are then transferred back to Bionic.
In addition, there is flexibility built into the process that allows you to work your own way. Regardless of how you work, the finance and media teams can stay in sync without the hassle of reentering data.
NOTE: This integration will only work with QuickBooks Online.
In this article, we'll cover:
- Enable QuickBooks Integration
- Connect QB Integration
- Mapping Your Vendors
- Manage Your QB Integration Settings
- Manage Bills
- Manage Payments
- Review QB Logs
Enable QuickBooks Integration
In order to connect with QuickBooks, you will need to first setup an integration.
NOTE: Only an Administrator user will be able to create an integration.
Here's how to enable Advantage integration in Bionic:
- Go to your Administration section.
- Select the Integrations Tab.
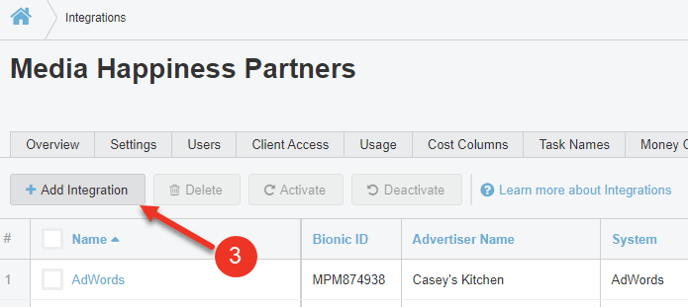
- Click on the Add Integration Button.
- Select QuickBooks.
- Press Next.
- Click Add Integration.


Connect QB Integration
Once you have enabled the integration, next step is to establish a connection that will authenticate your access.
- Click on the QuickBooks name in the Integrations view.
- In the QuickBooks Integration screen, go to the Connection section.
- Press Connect to QuickBooks.
-
A new "Intuit Accounts Sign In" window will open, enter your credentials and confirm sign in.
-
Your connection will be confirmed once completed.


Mapping Your Vendors
Now that you have completed your connection, it's time to map your vendors. The process of mapping will enable to you instruct which Bionic vendor is the equivalent in QuickBooks and vice versa.
TIP: When you first connect with QuickBooks, you should complete an initial mapping before processing data or updating any settings. This will ensure the transfer of bills and payments is seamless once you start processing financials. When complete, you will only need do mapping for new vendors you work with as they come along in the future.
Here's how to map your vendors:
- Click on Vendors.

TIP: You can search for a vendor using the search box or filter by Status (Matched, Only in Bionic, Only in QuickBooks, Ignored) to limit your vendor view.

There are two directions in which you can map vendors:
Map a QuickBooks Vendor to a Bionic Vendor
- Check off the box(es) of the lines you wish to map. (Alternatively, you can click the Match link in a line item to update an individual vendor.)
- Press the Match button.
- Use the Bionic Vendor Name dropdown to select the matching vendor(s).
- Click Save.
CAUTION: CAUTION: Please note that a Bionic vendor must be in a media plan in order to show up in the Matchmaker dropdown list.


NOTE: You can also choose to Ignore to map this QB Vendor by clicking the Ignore button.

Map a Bionic Vendor to a QuickBooks Vendor
- Check off the box(es) of the lines you wish to map. (Alternatively, you can click the Match link in a line item to update an individual vendor.)
- Press the Match button.
- Use the QuickBooks Vendor Name dropdown to select the matching vendor(s).
- Click Save.


NOTE: Using the Export button will export the Bionic Vendor(s) and create new Vendor(s) in QuickBooks.

NOTE: You can also choose to Ignore to map a Bionic Vendor by clicking the Ignore button.

Manage Your QB Integration Settings
Once you have mapped your vendors, you will want to configure your QB integration settings.
- Click on Settings.

Here is an explanation of the various settings you'll be configuring:
- Media Purchase Line Settings - This selection should align with how you have QB setup.
- Line Type - Select whether the Line Type should be Item or Account based.
- Item Name - The list will be driven based on what you have set up in QB. Select the appropriate Line or Account Name.
- Payment Accounts - Not required to specify.
- Email Alerts - Select email alert preferences.
- Automation - It is suggested to wait until after you have mapped vendors before turning on automations.
- Export Vendors - If on, Bionic will automatically export Vendors to QuickBooks when a Vendor is included in an Order.
- Export Bills - If on, Bionic will automatically export new Bills to QuickBooks.
- Import Bills - QuickBooks bills are not automatically imported, but contacts will be notified upon manual import.
- Export Payments - If on, Bionic will automatically export new Bill Payments to QuickBooks.
- Import Payments - If on, Bionic will automatically import new Bill Payments from QuickBooks.
CAUTION: Only Enable Automation options when you are ready to start exporting/importing between Bionic and QuickBooks. Enabling these options will immediately begin the automation process.
NOTE: It is recommended to enable the "Export Bills" and the "Import Payments" options. If you are unsure, please contact your CSM or Bionic Customer Support.

Manage Bills
Once you have completed the set up, you can start creating bills in Bionic, which will transfer to QB. If you have opted for automation, that transfer will happen upon saving the bills you create.
If you opt to not automate the transfer, or if you need to review any status of a bill transfer, the Bills section will provide complete details and ability to manually manage bills.
Here is an explanation of the information provided in the Bills section:
- Action - Clicking on an action link will Import, Export, Ignore, or display Log for a Bill depending on action.
- Vendor - The vendor of the bill.
- Bill Date - The bill date.
- Due Date - The due date of the bill.
- Ref # - The bill reference number defined at time of bill creation.
- Reconciled Amount - The reconciled amount of the bill.
- QB Balance - The bill amount displayed in QuickBooks.
- Last Update in Bionic - Date and Timestamp of last update.

TIP: You can search for a Bill using the search box or use the filters to limit your Bills view.
NOTE: Clicking on the Reconciled Amount will open the Edit Bill details.

Here are the actions you can take on the Bills page:
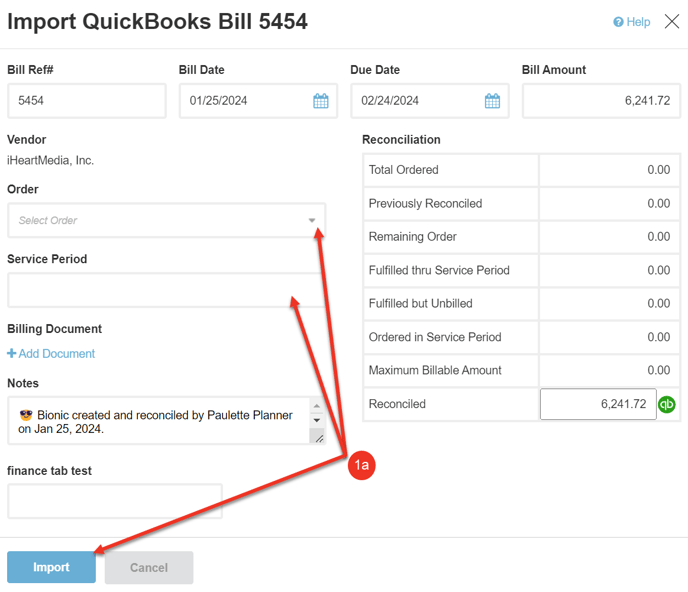
- Import Bill - Selecting import will import the bill into Bionic.
- When importing, the Edit Bill dialog will show up for you to select the associated Order and Service period.
- Export Bill - Selecting export will export the bill into QuickBooks.
- Ignore Bill - Selecting ignore will ignore the bill and not initiate an import/export.
- View Logs -
- Selecting Logs will take you to the transaction log of the import/export.
- You can also view the logs from of any indicated errors.


Manage Payments
Once bills get transferred to QB, accounting will typically make the payments directly within QB, which will transfer to Bionic. If you have opted for automation, that transfer will happen upon saving the payments you create.
If you opt to not automate the transfer, or if you need to review any status of a payment transfer, the Payments section will provide complete details and ability to manually manage payments.
Here is an explanation of the information provided in the Payments section:
- Action - Clicking on an action link will Import, Export, Ignore, or display Log for a Payment depending on action.
- Vendor - The vendor tied to the payment.
- Payment Date - Date of payment.
- Method - The payment method.
- Ref # - The payment reference number defined at time of payment creation.
- Payment Amount - The payment amount.
- QB Amount - The payment amount displayed in QuickBooks.
- Last Update in Bionic - Date and Timestamp of last update.

TIP: You can search for a Payment using the search box or use the filters to limit your Payments view.
NOTE: Clicking on the Payment Amount will open the Edit Payment details.

Here are the actions you can take on the Payments page:
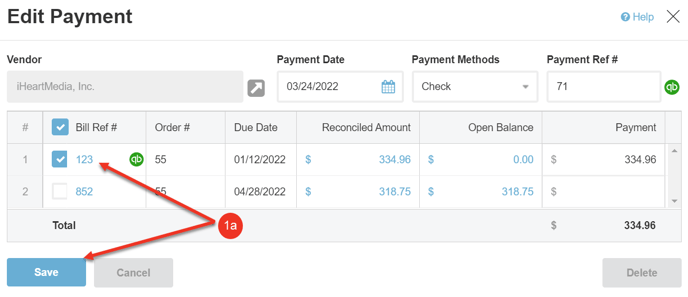
- Import Payment - Selecting import will import the payment into Bionic.
- When importing, the Edit Payment dialog will show up for you to select the associated Payment.
- Export Payment- Selecting export will export the payment into QuickBooks.
- Ignore Payment - Selecting ignore will ignore the payment and not initiate an import/export.
- View Logs - Selecting Logs will take you to the transaction log of the import/export. You can also view the logs from of any indicated errors.


Review QB Logs
Bionic logs every data transaction that occurs between it and QuickBooks. This log can assist with validating data transfers and also provides technical data for Customer Support to assist with troubleshooting issues.
Here is an explanation of the information provided in the Logs section:
- Transaction ID - Bionic Transaction ID of the specific action between Bionic and QuickBooks. Clicking on the Transaction ID will display the request/response log of the action.
- Timestamp - Date and Timestamp of when a transaction took place.
- Type - Type involved in transaction: Vendor, Bill or Payment.
- Object ID - Bionic's internal ID of the Vendor, Bill or Payment.
- Object Name - Bionic's name of the Vendor, Bill, or Payment.
- Action - Type of action processed.
- Request - Clicking on the request link will display the request/response log of the action.
- Response - Clicking on the response link will display the request/response log of the action.
- Status - Displays as Completed, Cancelled, or Not Completed.
- Error Info - If status is Cancelled or Not Complete, error info will provide description of error.

TIP: You can search the logs using the search box or the filters to limit your view.

Here is how to retry a transaction if it has a Cancelled or Not Complete Status:
- Click on the box(es) next to the line(s) you'd like to retry.
- Press Re-Try.
