Learn in Bionic Academy: Manage Your Campaigns - The Basics Course
Learn in Bionic Academy: Manage Your Campaigns - Intermediate Course
Every advertising campaign starts with a high level media budget. Those budgets are typically broken down into multiple pieces according to the strategy and goals of the advertising campaign.
Budgets might be bucketed according to a channel mix, a market strategy, a media investment strategy, a vendor strategy, a set of business initiatives, allocations for each media planner, or another segmentation strategy.
Buckets provide a way for you to clearly specify how a campaign budget should be broken out (totally custom to you), how much money is budgeted for each, manage approvals, and keep track of how much has been planned as you go. No more overspending. No more tracking somewhere else.
In this article we'll cover:
- Add Buckets and Budget
- Update Bucket Budget
- Establish Monthly Budgets for Each Bucket
- Authorize Budgets
Add Buckets and Budget
Here's how to add buckets for your campaign budget:
Note: The Budget should reflect the Total Media Cost.
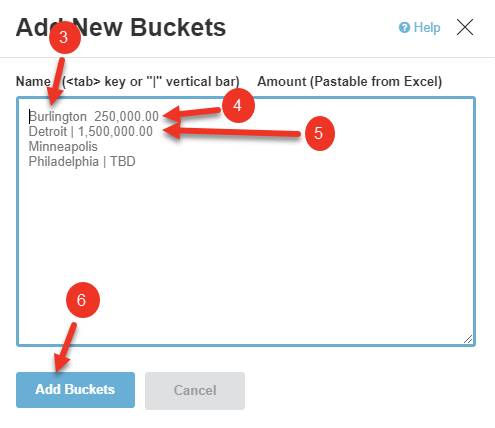
- In a Campaign, Click on the Budget Tab.
- Press the Add Buckets button.
- Enter the Name of the Bucket.
- To add Budget, Use Tab or "|" followed by the Budget. (Optional)
- Repeat in a new line for each Bucket as needed.
- Press Save Buckets.
NOTE: You can copy directly from Excel and paste into the text box. When copying, this should be two columns with labels on left and amounts on the right.

Update Bucket Budget
As you can see, each bucket has its own budget and you will be able to allocate individual placements to buckets in your media plan. You are able to update the budget for each bucket as needed. Here's how to update bucket budget:
- Click in the Budget column and update the Budget Amount to allocate.

NOTE: Once the budget is established for a bucket, the Share will display the percentage of the Total budget that bucket represents.
Establish Monthly Budgets for Each Bucket
Aside from establishing your overall budget for each Bucket you also have the option to breakout budget on a monthly basis per Bucket. Here's how:
NOTE: This option is only available if you have flight dates set for your campaign.
- Click the Show Monthly Checkbox.
- Columns for each month that your campaign spans will appear, Enter the Monthly Budget Amount to allocate to this Bucket.

Once monthly budgets have been established for a bucket the Total of Monthly (sum of monthly budgets) and Variance (difference between monthly budget and the Bucket's overall budget) will be calculated.
Authorize Budgets
Each Bucket in your campaign can be individually authorized, allowing you to keep track of each Bucket and store the respective PO Number, so you always know where things stand. You can authorize budgets by bucket or in bulk.
Authorization statuses include:
- Draft (blank) - This Bucket is currently being formulated.
- Pending - Authorization has been requested, but no response has been received.
- Authorized - Budget has been authorized for this Bucket.
- Rejected - Budget has been refused and should not be used in the media plan.
Here's authorize individual buckets:
- Use the dropdown in the Authorization column to update Authorization status for a Bucket.
- Enter the Associated PO Box.

Here's how to authorize multiple buckets simultaneously:
- Click on the checkbox next to the Bucket(s) you wish to Authorize.
- Press the Authorization button.
- Update Status.
- Enter Associated PO Box (if it is the same for each).
- Press Save.

