The Campaign Manager (DCM) Placement Import file (trafficking sheet) provides a Campaign Manager compliant upload of your media plan. This will eliminate the need to manually input placements into Campaign Manager. By uploading the file, it will also enable results to automatically flow back into the media plan.
You have the option to import just the Placements, or you can also include the Ad Group & Creative.
In this article, we'll cover:
- Enable Campaign Manager
- Configure Google Campaign Manager Report
- Configure Campaign Settings for Campaign Manager
- Enable Campaign Manager Custom Columns
- Populate Campaign Manager Columns
- Build Out Placements
- Configure Ad Level Data
- Export File
- Re-Export File When Adding or Changing Placements in Bionic
Enable Campaign Manager
In order to enable to Export file option, you must add the Campaign Manager integration in your account. Here's how to enable Campaign Manager in your account:
- Follow the Section, Define Integrations, in this help article: Configure Your Performance Integrations.
NOTE: In the list of data sources that come up, select Doubleclick Campaign Manager.
Configure Campaign Manager Report
For Bionic to be able to connect with your Campaign Manager account and enable results to automatically flow back into the media plan, the adapter must be configured first.
- Follow the Steps in this help article: Configure Google Campaign Manager.
Configure Campaign Settings for Campaign Manager
Once you have enabled and configured Campaign Manager for your account, the campaign will need to know which Campaign Manager account to connect to. Here's how:
- Follow the Steps in this help article: Set Campaign Integrations.
NOTE: When selecting integrations, choose the Campaign Manager account to connect to.
Enable Campaign Manager Custom Columns
There are two fields Campaign Manager requires to ensure placements are set up correctly. Here's how to setup these custom columns for your campaign:
- In a campaign, click on the Settings Tab.
- Go to the Other Columns section.
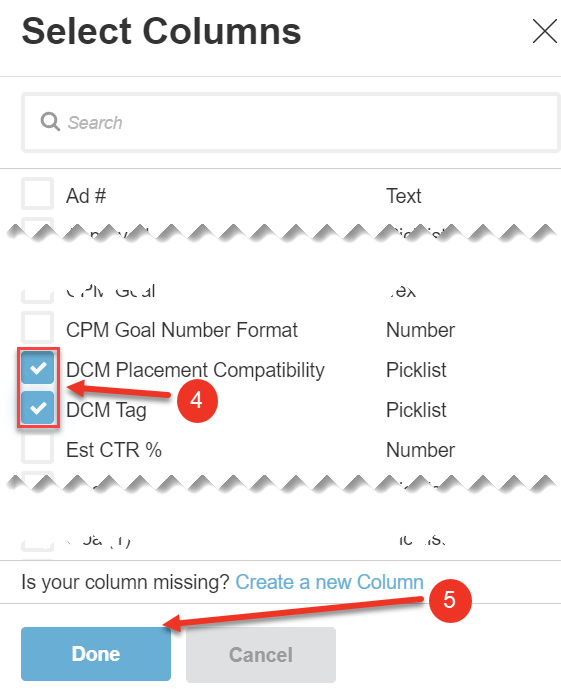
- Press Select Columns.
- Check the boxes for DCM Placement Compatibility and DCM Tag.
- Click Done.

Populate Campaign Manager Columns
After enabling Campaign Manager custom columns, you'll need to populate the data. Here's how:
- In a campaign, click on the Media Plan tab.
- Go to to the Custom section of the Media Plan.
- Use the Bulk Edit button or inline editing to populate the Campaign Manager columns.
NOTE: DCM Placement Compatibility is mapped to DCM export column "Placement Compatibility".
DCM Tag Indicates the type of DCM tag we should create for this line. If the advertiser's DCM ad server is serving the ads for this line, then a normal "ad serving" tag should be indicated. If the publisher is serving the ads from their ad server, then a "tracking only" tag should be created. In both cases, DCM is used for tracking. The real question is whether or not DCM serves the advertisement.

Using Bulk Edit

Using Inline Editing

When including the DCM Tag and DCM Placement Compatibility custom columns, these are the values that will then be exported to the DCM spreadsheet.
|
DCM Tag |
DCM Placement Compatibility |
Placement Compatibility |
Dimensions |
|
Blank/Null |
Blank/Null |
Display |
[Ad Unit] |
|
Blank/Null |
None Blank |
[Selected DCM Placement Compatibility] |
[Ad Unit] |
|
Ad Serving |
Blank/Null |
Display |
[Ad Unit] |
|
Ad Serving |
None Blank |
[Selected DCM Placement Compatibility] |
[Ad Unit] |
|
Tracking Only |
Any value including blank |
Display |
1x1 |
|
No Tag |
Any value |
Placement not exported |
|
Build Out Placements
You will also want to ensure your placements are fully built out. If you still need to build out your placements, follow the steps in this help article: Build Out Placements.
Configure Ad Level Data
If you opt to include Ad data in your import, you will need to configure the ad data appropriately.. Here's how to configure your Ad level data:
NOTE: The following steps assume the Ad has been added to the placement in the media plan. If you need to create an Ad, please refer to these help articles: Create an Ad and Configure Ad Settings.
- In the Media Plan, go to the Basics section.
- In the line item, click on the Ad.
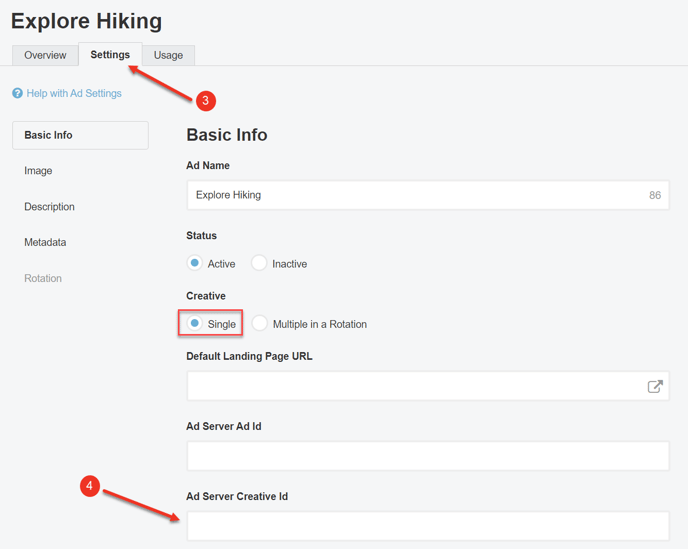
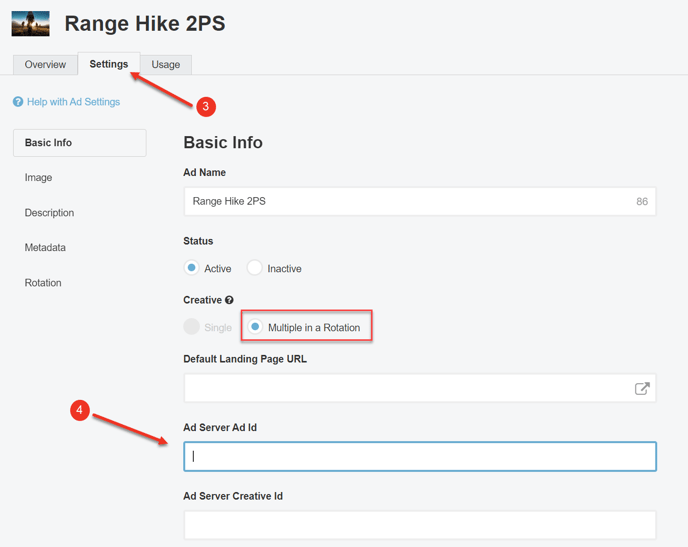
- Go to Settings of the Ad.
- In Basic Info section, Enter the Ad Id:
- If Single, enter the Ad Server Creative Id.
- If Multiple in a Rotation, enter the Ad Server Ad Id.

Creative Rotation Ad
Export File
Now that all of the data has been built out, you are ready to export the Campaign Manager import file. Here's how to export the file:
- Press the Export button on the upper right of the campaign.
- Select the DCM Placement Import option.
- Click Export.
- The file will automatically output in a Campaign Manager (DCM) compatible format.
- Then, import the file to Campaign Manager.
- Once uploaded to Campaign Manager, you will receive an email with the status report. You can upload this status report to Bionic using these steps to automate the Source ID mapping process.


NOTE: Only the following Channels will be exported to the DCM spreadsheet:
- Audio
- E-Newsletter
- Native
- Online Display
- Search
- Social
- Video
- Mobile Display
- SMS
When exporting data from Bionic into the DCM spreadsheet, Bionic will convert the Bionic cost methods to DCM cost methods. The translations are shown below, where you see N/A the cost method field in the DCM spreadsheet will be left blank.
|
Bionic Cost Method |
Description | DCM Cost Method |
| CPA | Cost Per Action | CPA |
| CPM | Cost per 1000 impressions | CPM |
| CPC | Cost Per Click | CPC |
| CPL | Cost Per Lead | CPA |
| CPCV | Cost Per Completed View | CPA |
| CPP | Cost Per Point | N/A |
| CPV | Cost Per View | CPM |
| dCPM | Dynamic CPM | CPM |
| Each | Per Item | N/A |
| Flat | Flat Rate | Flat Imps |
| Make Good | CPM | |
| PCI | Per Column Inch | N/A |
| Per Spot | N/A | |
| Value Add | Included at no charge | CPM |
| vCPM | viewable CPM | vCPM |
| /Day | per Day | N/A |
| /Week | per Week | N/A |
| /Month | per Month | N/A |
| /4wk Period | per 4wk Period | N/A |
When including the DCM Tag and DCM Placement Compatibility custom columns, these are the values that will then be exported to the DCM spreadsheet.
| DCM Tag |
DCM Placement Compatibility |
Placement Compatibility | Dimensions |
| Blank/Null | Blank/Null | Display | [Ad Unit] |
| Blank/Null | None Blank | [DCM Placement Compatibility] | [Ad Unit] |
| Ad Serving | Blank/Null | Display | [Ad Unit] |
| Ad Serving | None Blank | [DCM Placement Compatibility] | [Ad Unit] |
| Tracking Only | Any value including blank | Display | 1x1 |
| No Tag | Any value | Placement not exported |
Re-Export File When Adding or Changing Placements in Bionic
If you add or change placements in Bionic, you simply need to re-export the file again. Here's what to do if you have added or changed placements in Bionic:
- In a media plan, use the filters to limit your view to the added/changed placements.
- Follow Export File Steps again.
CAUTION: Source IDs need to be mapped to ensure existing placements are updated.
