Build Out Packages & Roadblocks
Here's How to Build Out Packages & Roadblocks in Bionic for Agencies.
Learn in Bionic Academy: Manage Media Plans
Media Plans in Bionic can support both packages and roadblocks to represent buys where you are paying a single rate that incorporates multiple placements.
Packages are made up of multiple, independent placements. For example, you may receive two display placements, an e-Newsletter banner, and a Social post for one flat rate.
Roadblocks are similar - one price for multiple placements. However, it is assumed the placements share metrics. For example, you may buy a homepage takeover containing a Top Leaderboard, Half Page, and Bottom Leaderboard. Instead of counting individual impressions for each placement, they are shared among the three placements.
In this article, we'll cover:
- Add a Package or Roadblock
- Build Out Package Details
- Adjust Weight of Placements
- Move Standalone Placements Into Packages
- Update Package Name
- Clone Packages
- Collapse/Expand Packages & Roadblocks
- Delete Packages & Roadblocks
Add a Package or Roadblock
Within your media plan, you may need to setup Packages or Roadblocks. The process for both is the same. Here's how:
- In a Media Plan, click the Add Placements arrow
- Select Add Package (or Roadblock).
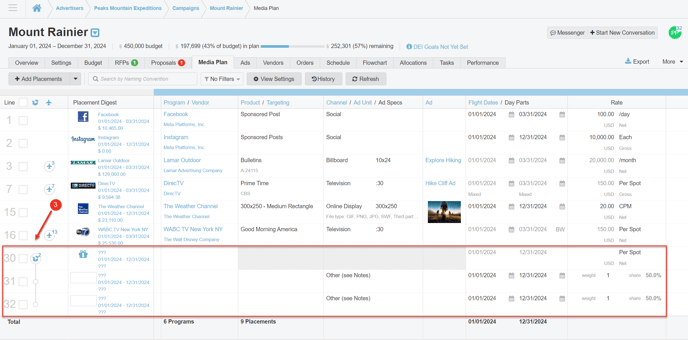
- Navigate to the newly created Line Items.


Build Out Package Details
Here's how to build out package details:
- The first line is the Package Header, Enter the Program & Rate/Qty as appropriate.
-
The two subsequent lines represent the individual placements that make up the package; Update the Program Name for individual placements if appropriate.
-
Complete the Placement Details as you normally would.
-
You can add Additional Lines within the Package or Roadblock if necessary.
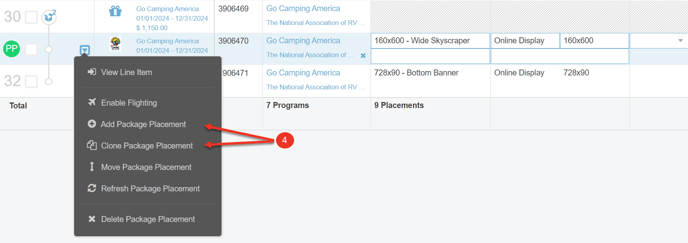
TIP: You can add additional lines by opting to Add Package/Roadblock Placement or Clone Package/Roadblock Placement. Cloning is typically the easiest option so you only need to change what's different.


Adjust Weight of Placements
Because the rate is shared across placements, Bionic assumes each placement will hold an equal share of the value. Weight is measured in contrast with the values set with each placement, enabling you to use a variety of methods. Most common values might reflect cost, percentage, or ratio.
If needed you can adjust the weight of the placements to accurately reflect value for placements worth more. Here's how:
- Enter the weight values in the Weight fields of the placements.
NOTE: Bionic will automatically calculate the placement quantities and costs accordingly.

Move Standalone Placements Into Packages
If you have existing placements and discover they need become a package, you can create a package and move the placements into the package. Here's how:
- If Necessary, Add New Package/Roadblock.
- Update the Program and Rate/Quantity if needed.
- Click, Hold and Drag the Line Number of the Placement into the Package.
- Press Add to Package.


NOTE: Placements can also be removed from packages using Drag and Drop.
Update Package Name
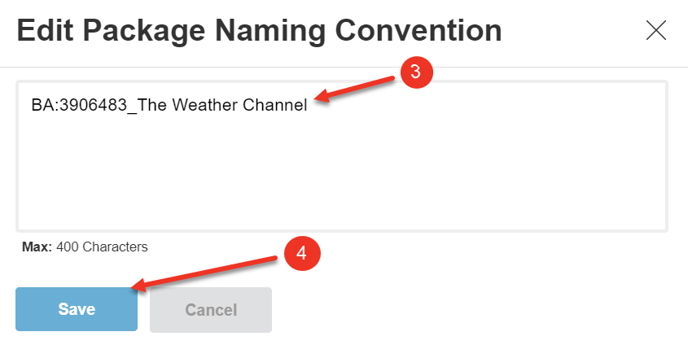
By default the Package Name will appear as the Program name + Package (i.e. Forbes Package). You can edit this Package Name. Here's how:
- Scroll the the Implementation section of the Media Plan and Find Naming Convention column.
- Hover over the package header's name and Click the Pencil icon.
- Update the Package Name.
- Click Save.


Clone Packages
There are a few ways you can Clone Packages:
- Clone Individual Package
- Bulk Clone Packages
Clone Individual Package:
- From the Package Header, click on the Action Item menu.
- Select Clone Package.
NOTE: Your package will be duplicated directly beneath the original package, and you can make changes as needed.

Bulk Clone Packages:
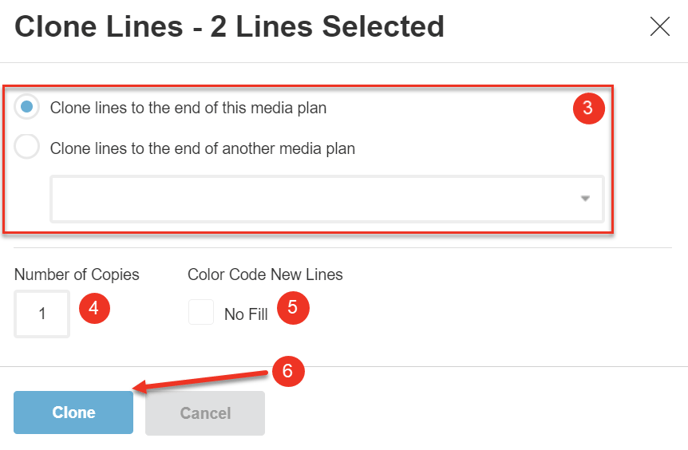
You can also clone multiple packages simultaneously. Here's How:
- Check off the Boxes next to the Package Header(s) you wish to clone.
- Click the Clone button.
- Select where to Clone the Packages.
- Choose Number of Copies.
- Color Code new lines (optional).
- Click Clone.


Collapse/Expand Packages & Roadblocks
To condense your media plan you can collapse packages and roadblocks. This will take all of the lines you have dedicated to a package/roadblock and collapse them into one row, the Package Header. Once collapsed, you can expand the package or roadblock to display all lines again. Here's How:
- Click on the package (or roadblock) icon.
TIP: Once collapsed only the package header will display. The icon will now show a closed package and the number of placements within the package.

Delete Packages & Roadblocks
You have different options to how to Delete Packages/Roadblocks within your media plan. Here is an explanation of the different options and how to delete packages/roadblocks:
- Click on the Action menu Icon next to the Package/Roadblock you wish to delete.
- Select how you'd like to Delete Package/Roadblock:
- Delete Only the Package (or Roadblock) will keep the individual line items so they can be managed independent from each other. They will no longer be part of a Package or Roadblock.
- Package (or Roadblock) and Contents will delete the ENTIRE Package or Roadblock.

TIP: Another way to delete a package or roadblock is to use the Delete button. To delete ONLY the package header, which will leave you with individual placements for each of the package members, select the JUST the package header row then click Delete. To delete the entire package, select ALL lines in the package and click Delete.

Next Steps: