Learn in Bionic Academy: Deliver Flawless Naming Conventions
Naming conventions can be a critical component to define your placements that can be extremely time consuming to generate and often at high risk for errors. Naming conventions can also apply to Campaigns, Packages, and Ads. Bionic can automatically generate these names for you, even if you have a complex naming convention. In short, what you may be generating in a spreadsheet can likely be replicated in Bionic.
TIP: Your CSM or Bionic Customer Support (support@bionic-ads.com) can help you translate your data and work through the process if you need assistance.
In this article, we'll cover:
- Define Your Naming Conventions
- Set Up Custom Data References
- Implement Your Naming Convention
- Push Updates To Existing Placements
- View Naming Conventions
Define Your Naming Conventions
You can opt to use the Bionic default naming conventions or choose to customize any or all of the naming conventions to support specific nomenclatures.
Customizations can be applied to your organization as a whole, or you can opt to customize individual advertisers.
Bionic Default Naming Conventions
Bionic provides a default naming convention that is set up as the following:
Campaign: <BionicCampaignID>_<CampaignName>
Placement: <BionicPlacementID>_<ProgramName>_<ProductName>
Package: <BionicPlacementID>_<ProgramName>
Ad: <BionicAdID>_<AdName>
You can opt to utilize the default settings - no additional effort is needed.
NOTE: ID fields utilize the unique identifiers generated by Bionic for the respective item.
Customize Naming Conventions
The best starting point is to utilize your existing spreadsheet to help "map" the data points you need to data points available in Bionic.
TIP: You can build a custom campaign name that could be used to help build your placement name. This can create a very efficient automation process.
NOTE: Because Bionic plans operate at the placement level, not creative level, Bionic can generate placement naming conventions that represent the "Ad" tied to the placement. If there is a creative rotation, it is unable to generate separate names for each creative in the rotation.
- Document each spreadsheet field and which Bionic field would be the equivalent.
- If there is no corresponding field in Bionic, document that you will need to set up a custom field.
- For each field, identify:
- Do you need data to match exactly? For example, if "Program" is part of your structure and Bionic has a program listed as "The New York Times", but your typical reference is "NYT". Is it ok that it is "The New York Times"? Or does it HAVE to be "NYT"? If the latter, note a custom field for Program is necessary.
- Do you have codified values? For example, similar to above, one data point may be Medium/Channel. The friendly values for that may be Display, Social, and Video. However, the naming convention may need to convey Dis, Soc, Vid. Or maybe a representation of a client is a unique ID. Again, this would be another area to note as needing a custom field.
Here are two data structure examples using custom fields:

Set Up Custom Data References
Once you have identified a basic initial mapping, you will need to build out the custom fields.
As you do this, think about efficiencies. You can create custom fields for Advertisers, Programs, Vendors, Campaigns, Placements, Packages, and Ads that can help build out Campaign, Package & Placement names.
If there is an Advertiser value that is always the same, you can set it up as an Advertiser field, set the value once and never have to set it again. Placement level custom fields should be limited to data points that could potentially change from placement to placement, such as tactic or channel.
Here is an example of what your custom fields and related values might look like:

Here's how to setup Custom Data references:
- Set up Custom Fields.
- Select the values (metadata) for Advertisers, Vendors, Programs, Campaigns, and Ads. Placement values will be completed when you build your media plans.
Implement Your Naming Convention
Once you have defined your naming conventions, Bionic Customer Support or your CSM will need to implement the changes.
Here are the steps involved to implement your naming convention:
- Define what structure your organizational default should be.
- If you need specific structures for individual advertisers, communicate which advertiser(s) each structure should belong to.
- The Bionic staff will notify you once the change has been implemented.
CAUTION: Changes will automatically apply for anything NEW that gets entered. Bionic does NOT automatically apply these changes to existing data as to avoid changing things that should not be changed. Use the instructions below to apply the changes.
Push Updates To Existing Placements
Naming conventions for individual existing items will only apply the new update if you make changes to that item.
For any item, simply updating Metadata values will force an update to the naming convention. For Placements & Packages, using the batch update function can force an update to multiple lines or the entire plan at one time.
 Here's how to push updates to existing placements:
- You will need to change a value in your placements to force an update. Custom columns are usually the easiest. You have a couple of options:
- If custom columns in your media plan need updating anyhow, you can simply change the values as appropriate.
- If you do not need to change values, you can temporarily add a custom column for this update.
- Update the values to the custom column using the batch edit function. Upon completion of the edit, the naming conventions should be updated to reflect the new structure.
- If you added a temporary custom column,
- Repeat the batch edit function and delete the value.
- Remove the custom column.
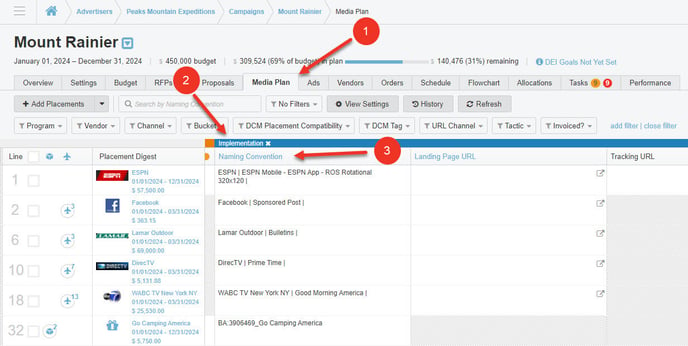
View Naming Conventions
Once your naming conventions have been defined and updated, you can view them in the Implementation section of your media plan.
- Navigate to the Media Plan.
- Scroll horizontally until you see the Implementation section.
- Look for the Naming Convention column, where standardized names are applied to each placement.
Tip: At the bottom of the Media Plan view, you can click on the blue dot to quickly get to the Implementation section. Clicking this dot will bring you to the Implementations section and the Naming Convention column.