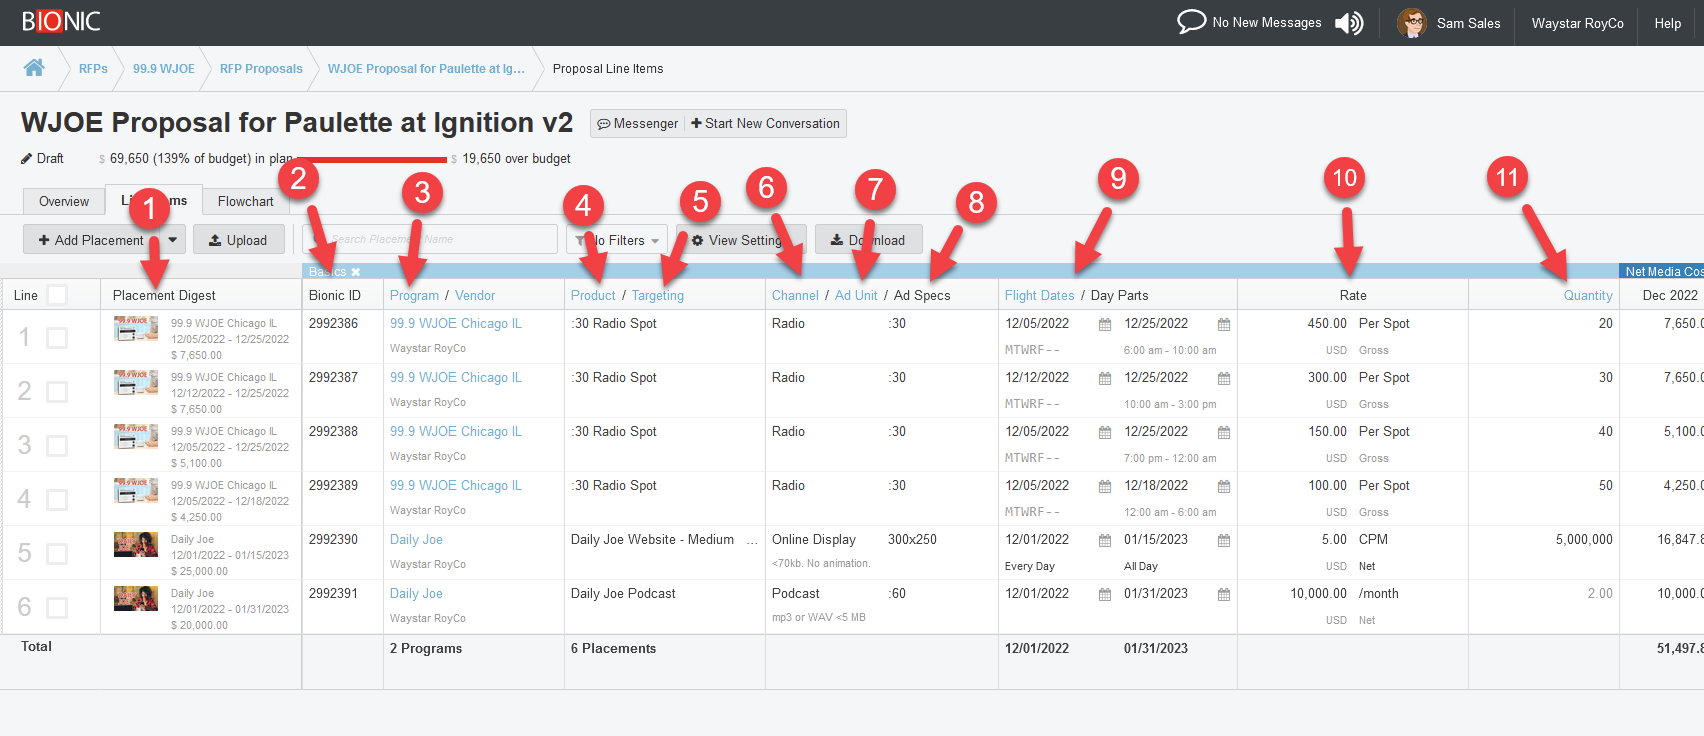
The Basics section of the proposal line items provides information common to all placements across all media channels.
Here's how to enter your placement basics:
- See Placement Digest
- See Bionic Placement ID
- Choose a Program
- Choose a Product
- Enter Targeting
- Choose a Channel
- Specify Ad Unit
- Enter Ad Specs
- Enter Flight Dates
- Enter Rate
- Enter Quantity
- Batch Edit
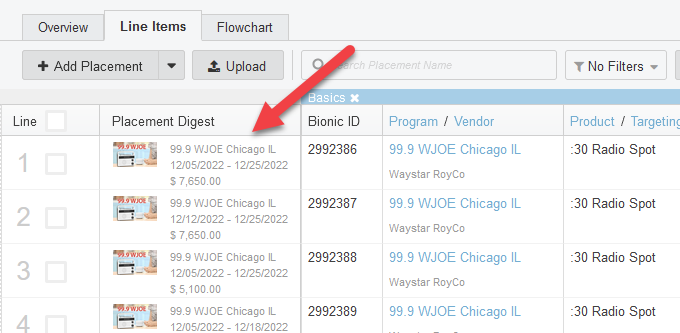
See Placement Digest
Bionic automatically builds the placement digest based on the values of the line. This is not editable.
The purpose of the placement digest is to help you to identify the line when you are scrolling.
On a blank line, you will see "???" and blanks. Don't worry - this will automatically populate as you complete the placement details.
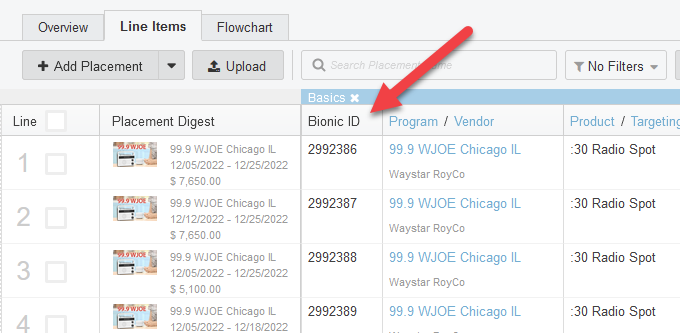
See Bionic Placement ID
Bionic automatically assigns a unique ID for every placement. This is not editable.
Choose a Program
To choose an advertising program:
- Click into the program field.
- See your list of Programs drop down.
- Start typing to filter the list.
- Select the program you wish to use.
Tip: If you don't find the program you need, complete the name and tab out of the field. Bionic will create a new program in your catalog with that name.

Tip: Building proposals is a lot easier when your program catalog is properly maintained and complete. See Manage Your Advertising Programs for instructions.
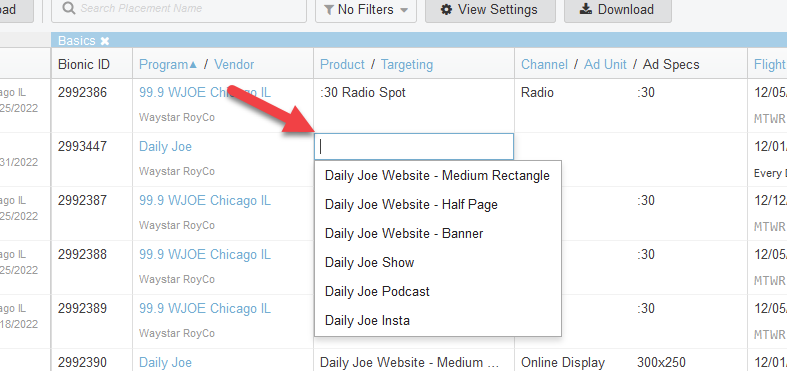
Choose a Product
To choose your advertising product:
- Click into the Product field.
- See your list of Products drop down.
- Start typing to filter the list.
- Select the Product by clicking it with your mouse or by using up and down arrows to select then pressing enter.
- Notice that after choosing your products, other field on that line automatically default to the product defaults.
Tip: If you don't see the product you need in the list, enter its full name and tab to the next field. Bionic will automatically add this new product to your program.
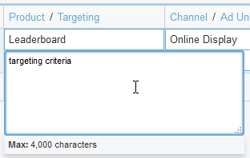
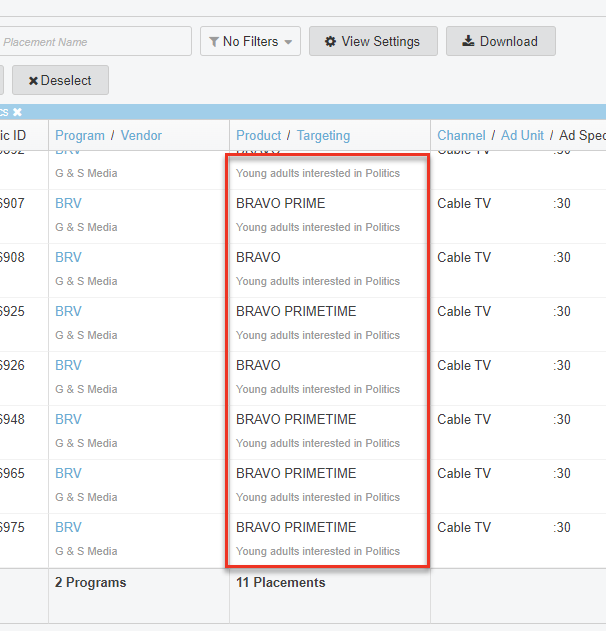
Enter Targeting
Enter any targeting if applicable
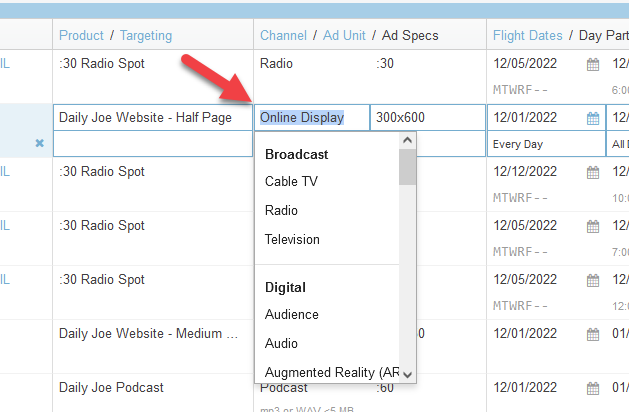
Choose a Channel
Note: After you Choose a Product, the Channel will fill with the default value for that product.
To choose or modify your channel:
- Click into the Channel field.
- See the list of Channels drop down.
- Start typing to filter the list.
- Select the Channel by clicking it with your mouse or by using up and down arrows to select then pressing enter.
Note: The list of channels is fixed. You cannot add to this list. If a channel you need is missing, contact Bionic Customer Support.
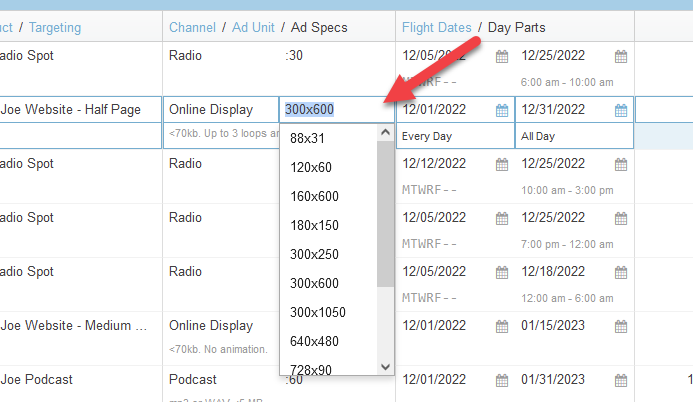
Specify an Ad Unit
Note: After you Choose a Product, the Ad Unit will fill with the default value for that product.
To change the ad unit:
- Click into the Ad Unit field.
- See the list of Ad Units drop down.
- Start typing to filter the list.
- If you see the Ad Unit you seek, select the Ad Unit by clicking it with your mouse or by using up and down arrows to select then pressing enter.
- If you don't see you Ad Unit in the list, just complete the entry and tab to the next field.
Tip: You're not limited to the list of standard ad units that drop down. You can enter any ad unit by typing in that field.
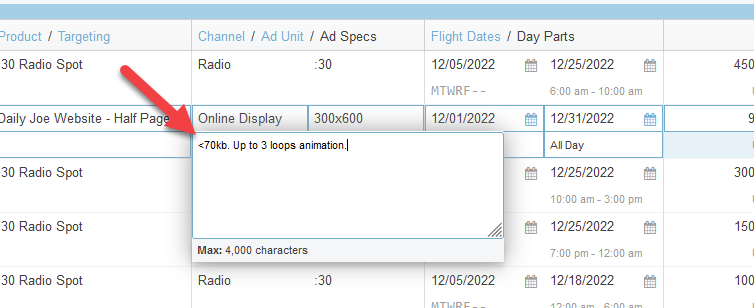
Enter Ad Specs
Note: After you Choose a Product, the Ad Specs will fill with the default for that product.
To enter ad specs:
- Click into the ad specs field.
- Notice that it expands to allow for a large amount of text.
- Manually enter (or copy/paste) your ad specifications into the text area.
- Tab to the next field.
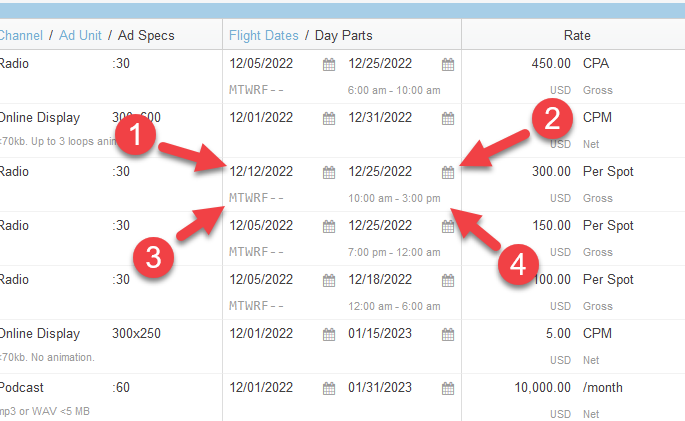
Enter Flight Dates
To Enter Flight Dates:
- Specify Start Date.
- Specify End Date.
- Choose Weekparts (optional).
- Choose Daypart (optional).
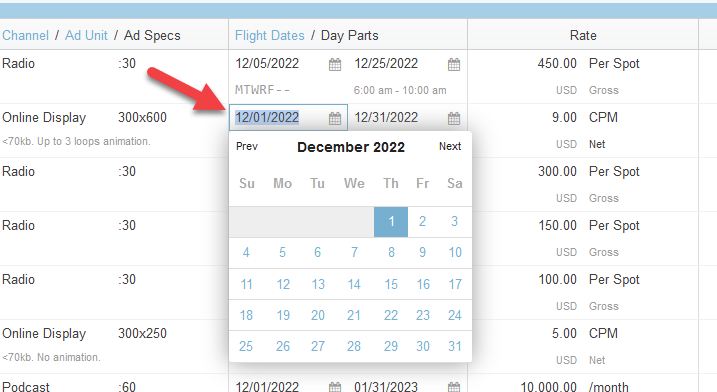
Specify the Start Date
Note: On a new line item, the Start Date will default to the campaign's start date.
To change the Start Date:
- Enter the Start Date or choose from the calendar.
Tip: As a shortcut, you can type just the month and day and the year will default to this year. For example, when you type "12/1" and tab away, it will become "12/01/2022".
Note: You can set the date format default in your user profile.
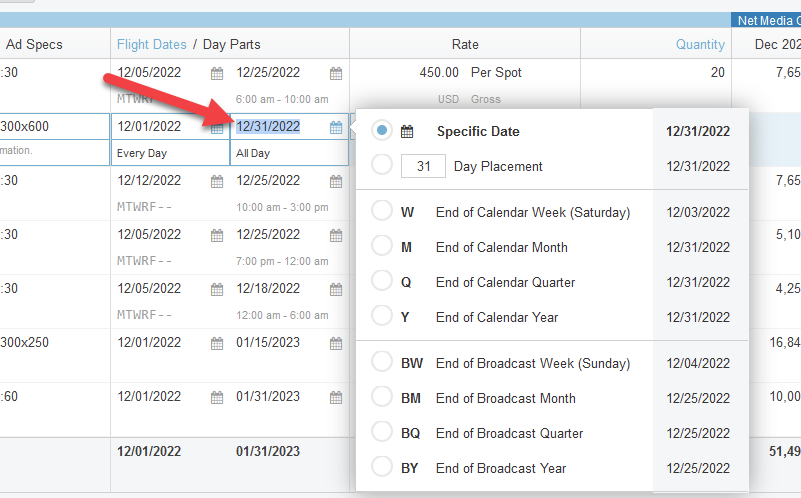
Specify the End Date
Note: On a new line item, the End Date will default to the campaign's end date.
To change the End Date:
- Enter the End Date or choose one of the options.
Note: If you choose any option other than a fixed date, the End Date will automatically update if you change your start date.
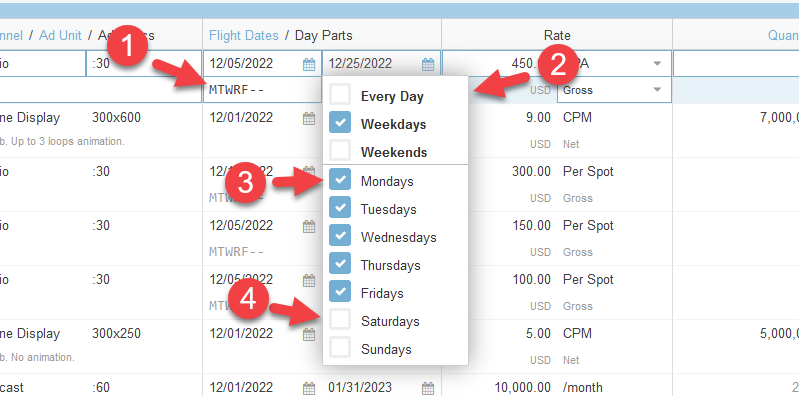
Specify Weekparts
Note: After you Choose a Product, the Weekparts will fill with the defaults for that product.
To change Weekparts:
- Click into the Weekparts field.
- See the Weekparts control drop down.
- Select the Weekparts to include.
- De-select the Weekparts to exclude.
- Tab to the next field or click away to close the Weekparts control.
Note: If no Weekparts (your ads run every day), the Weekparts will display as blank in your proposal when you are not editing that line.
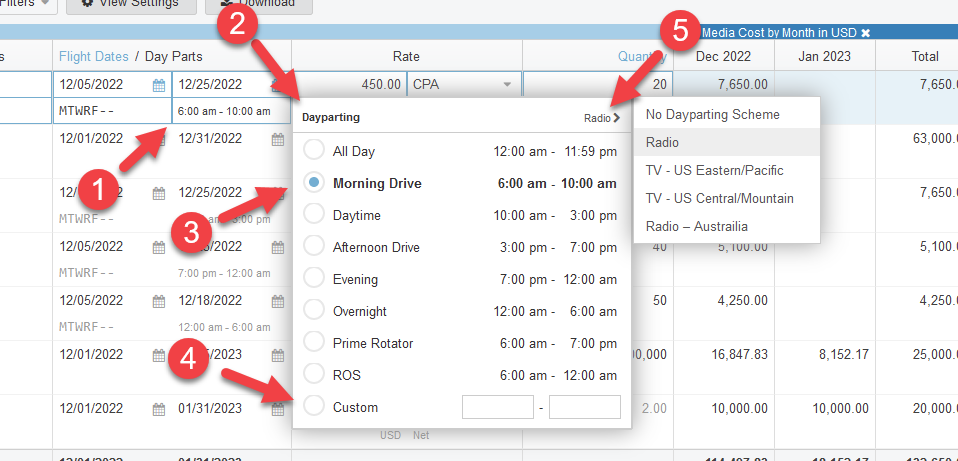
Specify Dayparts
Note: After you Choose a Product, the Daypart will fill with the defaults for that product.
To change your daypart:
- Click into the Daypart field.
- See the dayparting drop-down.
- Choose your daypart.
- Or create your own custom daypart by entering the start time and end time.
- To change your dayparting scheme, click the scheme name in the upper-right corner.
- Tab to the next field or click away to close the daypart control.
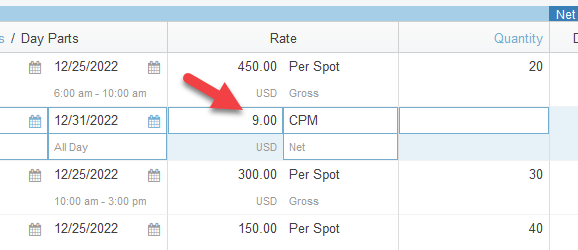
Enter the Rate
Note: After you Choose a Product, the Rate will fill with the defaults for that product.
To enter the Rate:
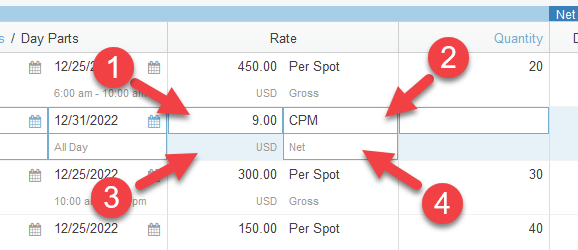
Enter Rate Amount
To change, enter the unit price of the media you're selling.
Choose Cost Method
To change, choose cost your cost method from the drop-down list.
Cost methods include:
- CPA - Cost Per Action (e.g., Acquisition)
- CPM - Cost Per Mille (Thousand) Impressions
- CPC - Cost Per Click
- CPCV - Cost Per Completed View
- CPE - Cost Per Engagement
- CPI - Cost Per Install
- CPL - Cost Per Lead
- CPLk - Cost Per Like
- CPP - Cost Per Point
- CPV - Cost Per View
- dCPM - Dynamic CPM
- Each - Per Item
- Flat - Flat Rate for the Entire Line
- Makegood - Added at No Charge as a Correction
- PCI - Per Column Inch
- Per Spot - Per TV, Radio, or Other Ad Spot
- Value Add - Included at No Extra Charge
- /day - Per Day
- /week - Per Week
- /month - Per Month
- /4WK Period - Per 28-Day Cycle (for Outdoor Billboards)

Choose Currency
To change, choose your Currency from the drop-down list.
Note: The currency selector is only available on campaigns that allow for multiple currencies.
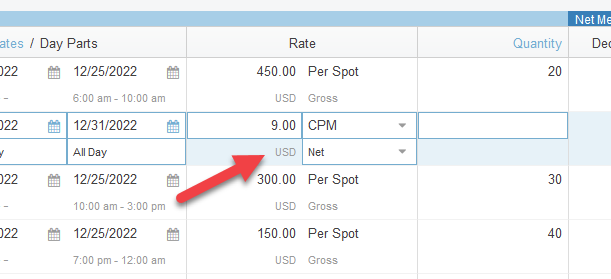
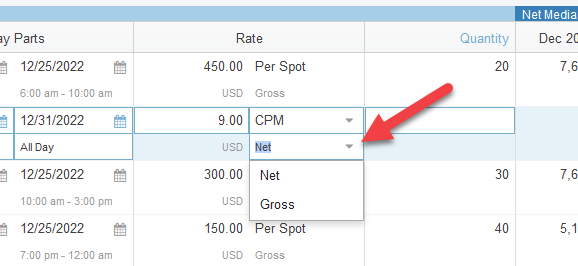
Choose Gross or Net
To change, choose Gross or Net from the drop-down.
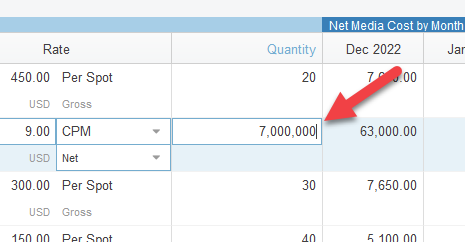
Enter Quantity
Enter the quantity according to the cost method. For example:
- If CPM, the Quantity will be the number of impressions.
- If Per Spot, Quantity will be the number of spots.
- If CPC, Quantity will be the number of clicks.
- If Per Month, Quantity will be the number of months.
Note: If rate is time-based (e.g., per month, per day), the quantity will calculate automatically based on your start date, end date, and Weekparts.
Tip: For quantities with lots of trailing zeroes (impressions), you can save keystrokes using the Tres Comas Feature where typing just "3,," resolves to "3,000,000" after you tab away.
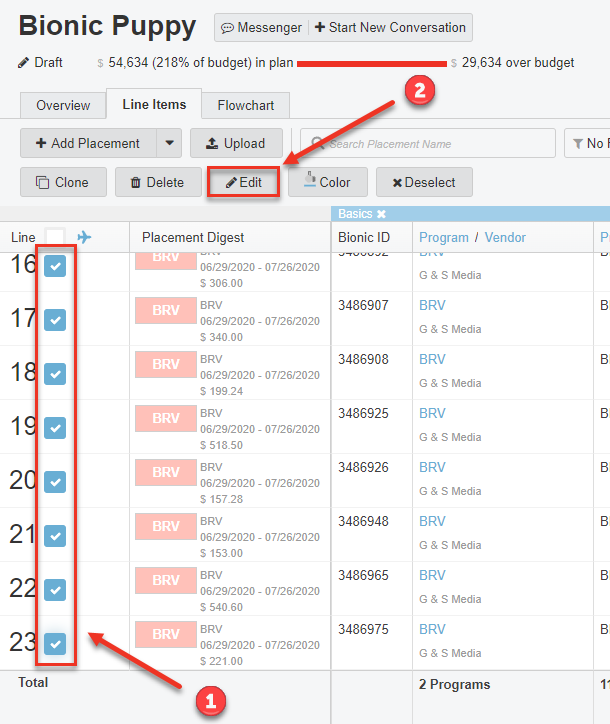
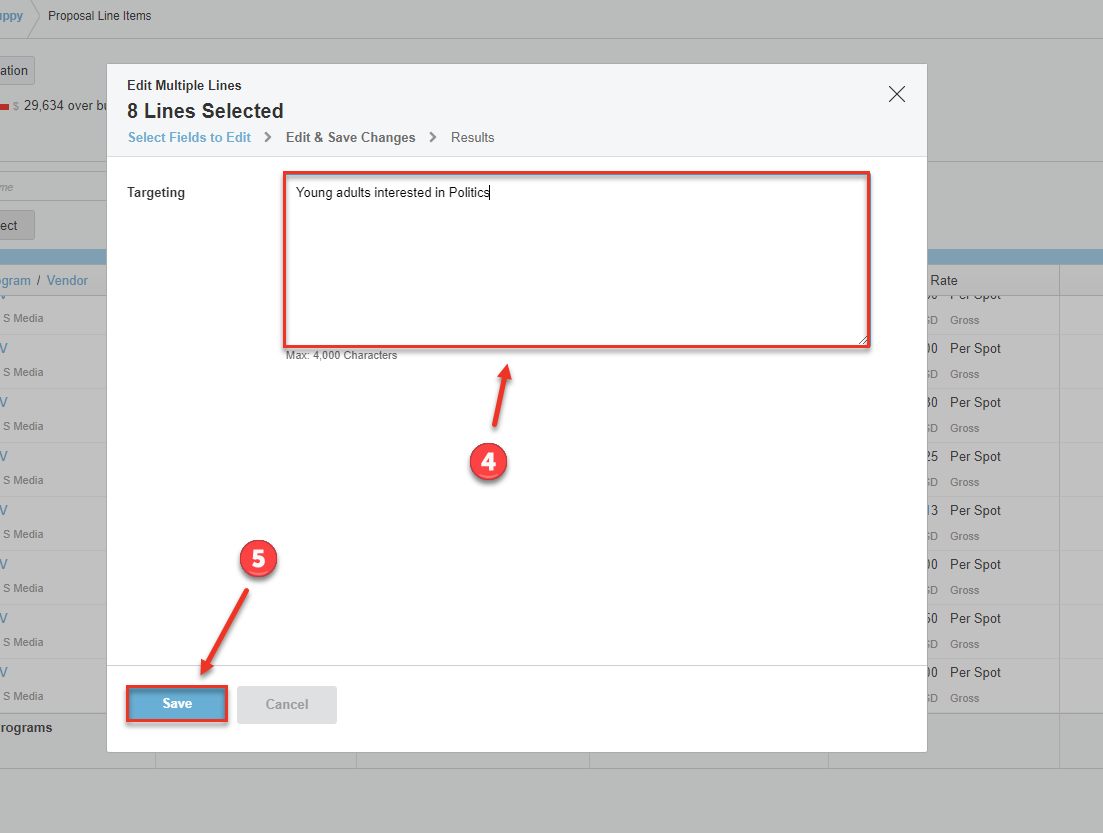
Batch Edit
Bionic gives you the ability to edit multiple fields all at the same time by using Batch Editing. This provides you to make quick mass edits.
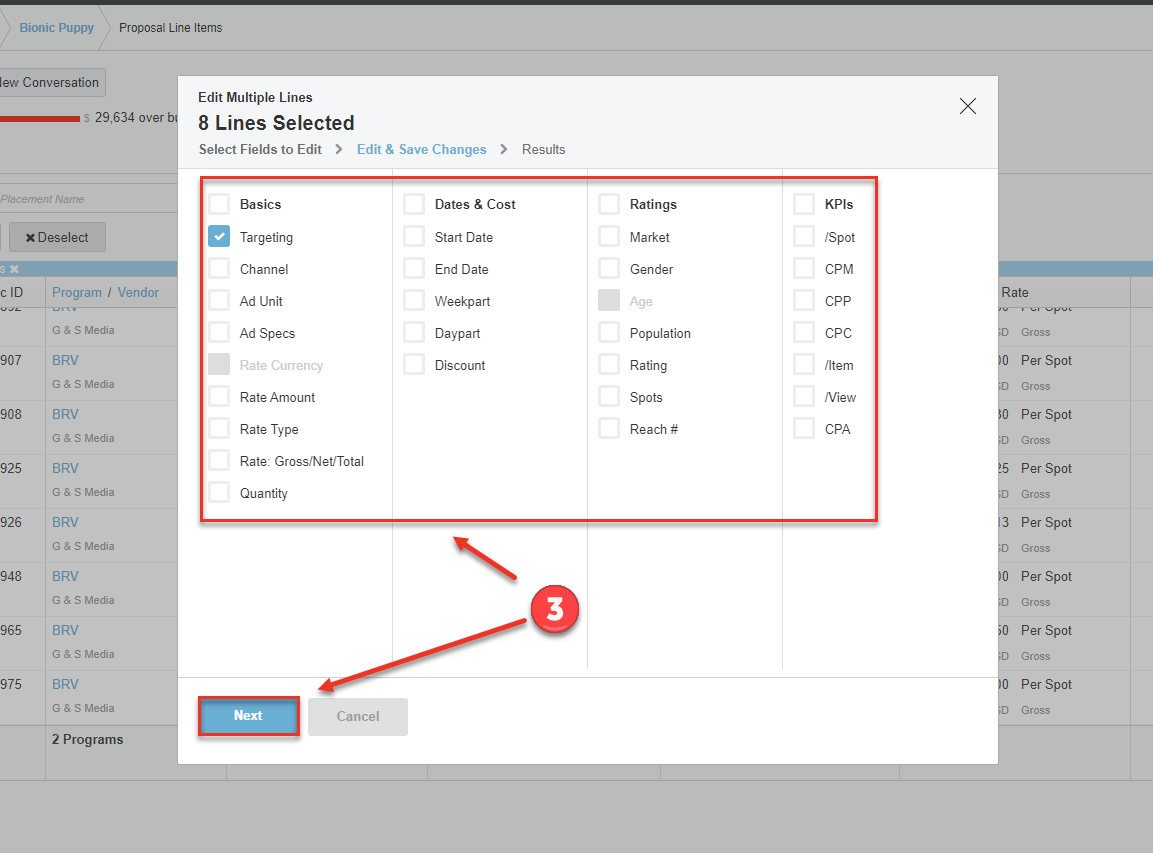
To edit fields in a batch:
- Click on the lines you wish to edit
- Click the Edit button
- Choose which field(s) you want to edit and press Next
- Make the edit(s)
- Click Save
Previous Step:
Next Step: