Integrate With Workamajig
Here's how to Integrate with Workamajig in Bionic for Agencies.
Bionic integrates with Workamajig (WMJ) to help streamline your finance team's workflow. With Bionic, you are able to export your Approved Orders and Bills, allowing you to import approved orders and bills to Workamajig.
The diagram below shows how orders and bills move between Bionic and Workamajig.

In this article, we'll cover:
- Understand Workamajig and Bionic Entities
- Set up Integration Compatibility in Workamajig
- Enable Workamajig Integration
- Map Your Workamajig IDs in Bionic
- Export Orders
- Manually Export an Order
- Update an Exported Order
- Generate Orders in Workamajig
- Export Bills
- Manually Export a Bill
1. Understand Workamajig and Bionic Entities
Here’s a quick table to help you match entities between Workamajig and Bionic. This mapping shows how terms in each platform line-up, helping you to understand what each entity represents as you work with the integration.
Please review the following entity mapping between Workamajig and Bionic:
|
Workamajig |
Bionic |
|
Client |
Advertiser |
|
Vendor |
Vendor |
|
Station or Publication |
Program |
|
Broadcast Item or Publication / Digital Media Item |
Channel |
|
Media Plan |
Campaign |
|
Media Plan Buy |
Order line |
|
Media Plan voucher |
Vendor Bill |
|
Payment |
Payment |
With this understanding, you’re ready to set up the integration between Workamajig and Bionic.
2. Set up Integration Compatibility in Workamajig
In order to properly integrate Workamajig with Bionic for Agencies, you will first want to ensure your Workamajig account is setup for compatibility.
NOTE: You will need the following permissions for both platforms: For Workamajig, an Org Level Admin and for Bionic, an Admin Planner.
Here's how to setup Workamajig:
- Enable Media Plans Functionality in Workamajig
- Enable 'Using Media' Option in Workamajig
- Import Bionic Channels to Workamajig
- Get API Access Token from Workamajig
- Generate API User Token from Workamajig
- Get Org Base URL from Workamajig
Enable Media Plans Functionality in Workamajig
NOTE: If you do not see this option in your Workamajig account, you will need to contact your Workamajig System Administrator to let them know you are a Bionic customer and request to have these options turned on.
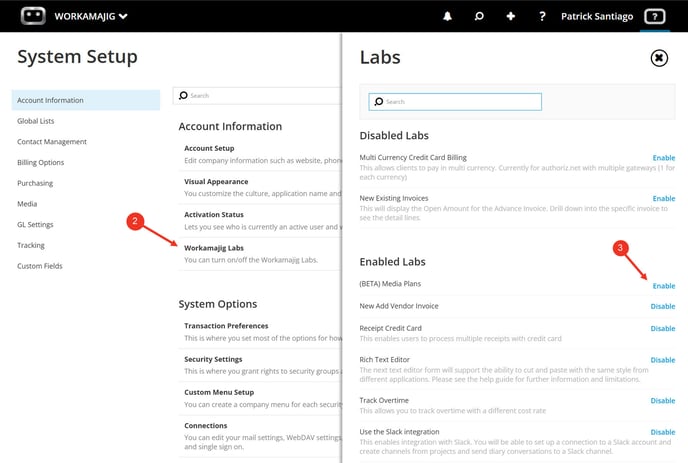
- In Workamajig, go to System Setup.
- Click on Workamajig Labs.
- Enable (BETA) Media Plans.

Enable 'Using Media' Option in Workamajig
NOTE: If you do not see these options in your Workamajig account, you will need to contact your Workamajig System Administrator to let them know you are a Bionic customer and request to have these options turned on.
- In System Setup, click on Transaction Preferences.
- Click on 'show advanced options'.
- Select Media.
- Check the Using Media checkbox.
- Click Save.

Import Bionic Channels to Workamajig
NOTE: If your Workamajig instance enables GL Tracking, the Department will be a required field for the following uploads.
- Download the Bionic Channels CSV files:
- In Workamajig, click on the Workamajig logo at the top left.
- Select Admin/Manager.
- Click Import Data.
- Using the dropdown, select Broadcast Items (or Print Items).
- Click Select a file to import and when prompted select/open the "Broadcast Items Import File" (or "Print and Digital Items Import File").
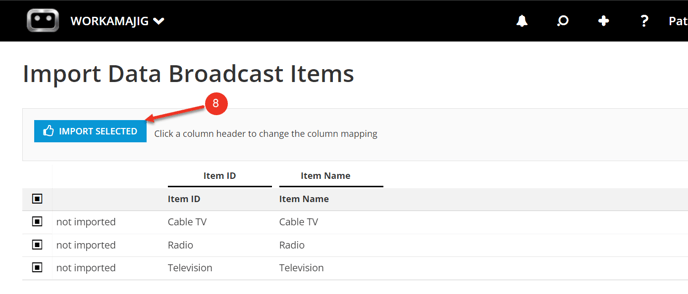
- Click Display File.
- Press Import Selected.
- Repeat Steps to import additional files.
NOTE: If you have any issues using our Bionic Channel CSV files or have conflicting Pre-existing items please Contact Bionic Support.


Get API Access Token from Workamajig
NOTE: If you do not have Workamajig Administration access, you may have to reach out to your Organization's Workamaig Admin to provide you with the API tokens. You will also need to be a Bionic Admin to input the API keys in Bionic.
- Click on the Workamajig logo at the top left.
- Select Admin/Manager.
- Click on System Setup.
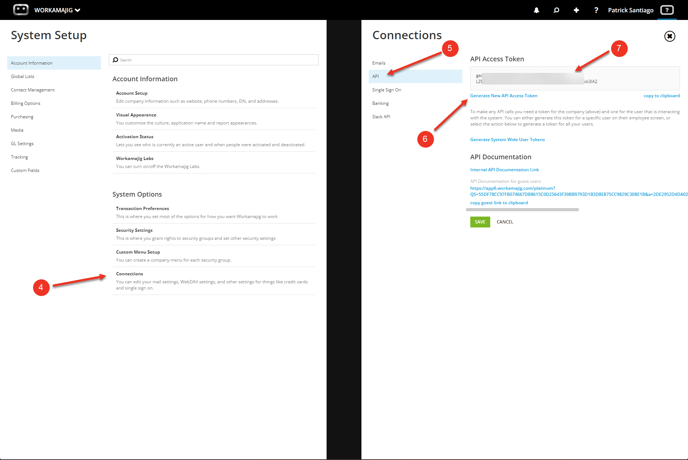
- In Account Information, under System Options, click on Connections.
- Click on API.
- (If Necessary) Click on Generate New API Access Token and follow the prompts.
- Copy and paste the API Access Token to have accessible.
NOTE: To generate a new API Access Token, click on Generate New API Access Token link and follow the confirmation prompts.

Generate API User Token from Workamajig
- Click on Your Name at the top right.
- Press New User Token.
- In API User Settings, click on New User Token.
- Once generated, copy and paste the API User Token to have accessible.


Get Org Base URL from Workamajig
- From the Address Bar in your Browser copy and paste the base URL (i.e. https://app6.workamajig.com) to have accessible.

3. Enable Workamajig Integration in Bionic
Once you have setup Workamajig, you will then want to enable Workamajig integration in Bionic:
2. Enter API, Access Token, API User Token and Org Base URL
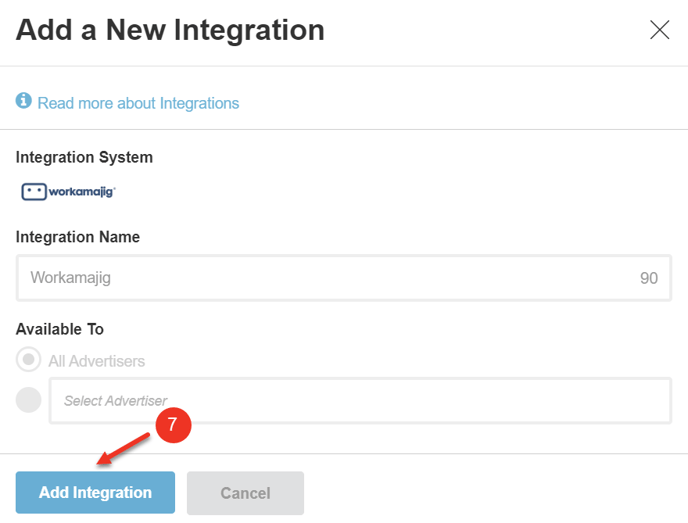
Add Workamajig Integration
- Click on Company Name at the top right.
- Press Administration.
- Select the Integrations Tab.
- Click on the Add Integration Button.
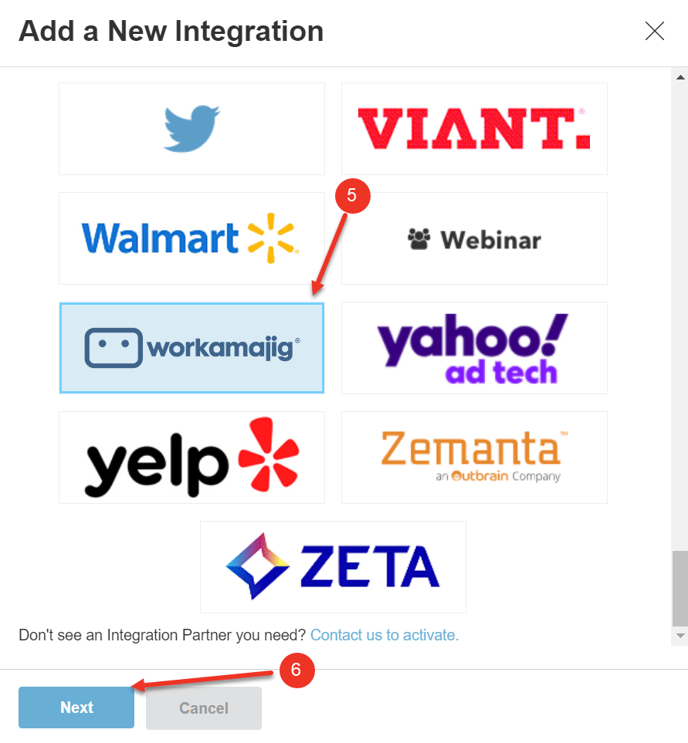
- Select Workamajig.
- Press Next.
- Click Add Integration.

Enter API Access Token, API User Token, Org Base URL in Bionic
- In the Integrations Tab. click Workamajig in the Name Column.
- Click on Connection.
- Enter API Access Token, API User Token and Org Base URL in the appropriate fields.
- Press Connect to Workamajig.


NOTE: Once connected, you can use the Test button to test the connection.
4. Map Your Workamajig IDs in Bionic
Send approved orders and bills created in Bionic to Workamajig by setting your Workamajig IDs in Bionic. Here's how to map your IDs in Bionic:
- Set Vendor ID on the Vendor Level
- Set Media ID on the Program Level
- Set Client ID on the Advertiser Level
- Set Project Number on the Campaign Level
NOTE: You will need to have access for the Project, Vendor, Stations and Publications screens in Workamajig in order to capture the necessary IDs to map to Bionic. If you do not have access, please reach out to your organization's Workamajig Administrator to provide you access or the necessary IDs.
Set Vendor ID on the Vendor Level
The Vendor ID will represent the Workamajig Vendor ID established for this vendor. For this value, you will establish it once for each Vendor and this data will be used for all campaigns that contain the vendor in the plan.
NOTE: If you do not have a 1:1 relationship between the Vendors entity in Workamajig and Bionic, please contact support for further assistance. We do have a solution for this which will have to be enabled on your Workamajig instance.
First, we will need to download a list of Vendors and their Vendor IDs from WMJ to use to populate the WMJ Vendor ID in Bionic. Then, we'll add the Vendor ID(s) in Bionic. Here's how:
- In Workamajig, click on the magnifying glass icon in the nav bar at the top right.
- In the Views tab, under Purchasing, click Vendor List.
- Select Active Vendors.
- If applicable, enter a search criteria, or just click Search to display all.
- Click the Print icon.
- Select Standard Report Excel.
- Then in Bionic, go to the Vendors Tab.
- Input the Vendor ID(s) in the Workamajig Vendor ID column for the associated vendor(s).


NOTE: To view or configure metadata for an individual vendor visit this help article: Set Vendor Metadata.
Set Media ID on the Program Level
The Media ID will represent the Workamajig Station/Publication ID established for this vendor. For this value, you will establish it once for each Program and this data will be used for all campaigns that contain the program in the plan.
First, we will need to download a list of Stations/Publications and their Media IDs from WMJ to use to populate the WMJ Media ID in Bionic. Then, we'll add the Media ID(s) in Bionic.
NOTE: Note regarding difference between Stations and Publications and why you may need both lists to download.
Here's how to download a list of Stations:
- In Workamajig, click on the magnifying glass icon in the nav bar at the top right.
- In the Views tab, under Media, click Stations.
- Click on All TV Stations.
- If applicable, enter a search criteria, or just click Search to display all.
- Click the Print icon.
- Select Standard Report Excel.


Here's how to download a list of Publications:
- In Workamajig, click on the magnifying glass icon in the nav bar at the top right.
- In the Views tab, under Media, click Publications.
- Click on All TV Stations.
- If applicable, enter a search criteria, or just click Search to display all.
- Click the Print icon.
- Select Standard Report Excel.


Here's how to add the Media ID(s) in Bionic:
- Log into Bionic.
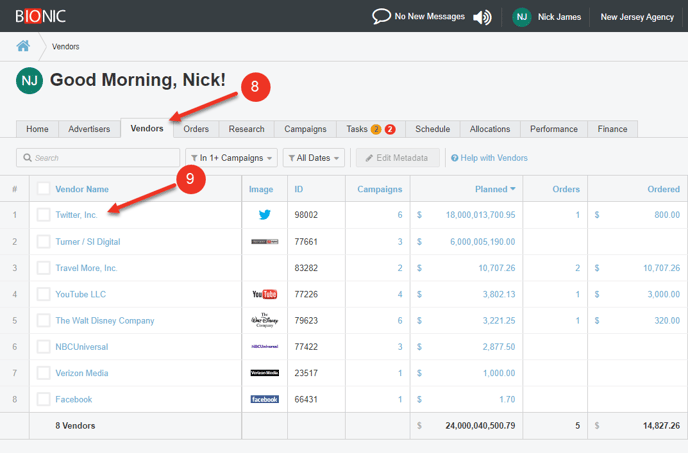
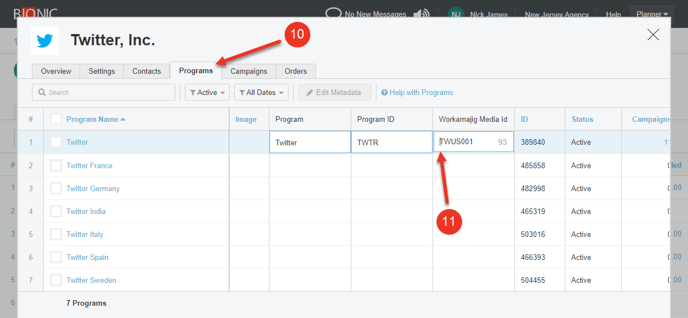
- In Bionic, go to the Vendors Tab.
- Select the associated Vendor.
- Click on the Programs tab.
- Input the Station ID(s) in the Workamajig Media ID column for the associated program(s).
NOTE: To view or configure metadata for an individual program visit this help article: Set Program Metadata.
Set Client ID on the Advertiser Level
The client ID will represent Workamajig Client ID established for an advertiser. For this value, you will establish it once for the advertiser.
First, we will need to download a list of your Clients and their Client IDs from WMJ to use to populate the WMJ Client ID in Bionic. Then, we'll add the Client ID(s) in Bionic. Here's how:
- In Workamajig, go to the main menu options and select salesperson.
- Click on today - sales.
- Under views, click on Companies.
- Click on Client Listings.
- If applicable, enter a search criteria, or just click Search to display all.
- Click the Print icon.
- Select Standard Report Excel.
- Then in Bionic, go to the Advertisers Tab.
- Input the Client ID(s) in the Workamajig Client ID column for the associated advertiser(s).


NOTE: To view or configure metadata for an individual advertiser visit this help article: Set Advertiser Metadata.
Set Project Number on the Campaign Level
The Project Number will represent the Workamajig Plan ID established for this campaign. For this value, you will establish it once for this campaign and it will convey to the orders and bills exported from this campaign.
Here's how:
- In Workamajig, go to the main menu options and select project manager.
- Click projects.
- Find the associated Project, copy and paste the Project Number to have accessible.
- Repeat for other Project Number(s) as necessary.
- Once you have your Project Number(s), go to Bionic and click on the Campaigns tab.
- Input the Project Number in the Workamajig Project Number column for the associated campaign.
- Repeat as Necessary.


NOTE: To view or configure metadata for an individual campaign visit this help article: Set Campaign Metadata.
5. Export Orders
When you approve an order in Bionic and Workamajig integration is enabled, the order will automatically be sent to Workamajig.
NOTE: When exporting orders to Workamajig, please ensure the Order includes a selected Channel. Workamajig requires this data in order to export successfully.
Here's how to approve orders in Bionic: https://help.bionic-ads.com/knowledge/approving-orders
NOTE: If there were any approved orders that existed prior to configuring the integration, they will not be automatically sent. Those orders will have to be manually exported, see next step on how to Manually Export an Order to Workamajig.
6. Manually Export an Order
For orders that existed prior to configuring integration or those that failed to export, you have the option to manually export an Order to Workamajig. Here's how:
- In Bionic, access your Workamajig Integration Admin panel.
- Click on Orders.
- Find the Order you wish to Export (or Re-Export) and click the Export/Re-Export link.
NOTE: You also have the option to Ignore specific Orders. Ignoring them will hide them from view.


7. Update an Exported Order
You can update the order details by first Revoking or Un-approving the order in Bionic, making the updates, then Re-approving the order to allow it to be resent to Workamajig.
Here's how to update an Order to Workamajig when this integration is enabled: Handle Changes to Existing Orders.
NOTE: Please do not reuse line items that have already been transmitted to your accounting system in approved orders. Once transmitted, those lines are part of the accounting record, and reusing them can cause mismatches.
Instead, create a new order with new line items under the correct vendor. For ease, you may also clone the original line items into the new order rather than rebuilding them manually.
Accounting integrations may not always create a revision when identical line items are resent, and because behavior can vary by system, the safer approach is to create or clone new ones.
8. Generate Orders in Workamajig
Once Bionic orders have successfully been transmitted to Workamajig, you can use the Workamajig “Release Orders” process to convert Media Plan Buy lines into Workmajig Broadcast orders or Workamajig Publication/Digital orders depending on the rules setup in Workamajig. Here's how:
- In Workamajig, go to the main menu options and select media.
- Click on media plans.
- Select the media plan you wish to release orders for.
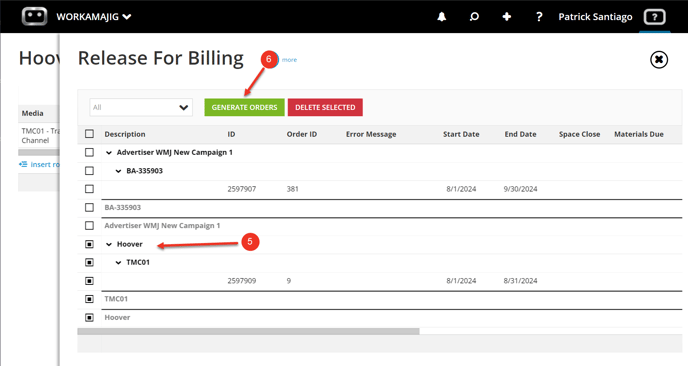
- Click on Release Orders.
- Select the lines you want to Generate Orders for.
- Click Generate Orders.


9. Export Bills
When you create a bill in Bionic and Workamajig integration is enabled, the bill will automatically be sent to Workamajig.
NOTE: In order to successfully export a bill to WMJ, you must first release the order. Here's how: Generate Orders in Workamajig.
Here's how to create a bill in Bionic: https://help.bionic-ads.com/knowledge/reconcile-your-bills
NOTE: If there were any approved bills that existed prior to configuring the integration, they will not be automatically sent. Those bills will have to be manually exported, see next step on how to Manually Export a Bill to Workamajig.
10. Manually Export a Bill
For bills that failed to export, you have the option to manually re-export an Order to Workamajig. Here's how:
- In Bionic, access your Workamajig Integration Admin panel (via the Integrations tab in your Administration page).
- Click on Logs.
- Click on the Checkbox for the Bill(s) you wish to Export.
- Press the Re-try button.


TIP: Please note you are unable to update to a Bill once it has been exported to Workamajig due to limitations of the Workamajig API. Any updates to an exported Bill must be updated in Workamajig.